 WPF中文网
通过前面的章节学习,我们来尝试利用学过的布局控件,设计一款简单的UI界面。
    <Grid>
        <Grid.RowDefinitions>
            <RowDefinition Height="auto"/>
            <RowDefinition Height="*"/>
            <RowDefinition Height="auto"/>
        </Grid.RowDefinitions>
        <Grid.ColumnDefinitions>
            <ColumnDefinition Width="auto"/>
            <ColumnDefinition/>
        </Grid.ColumnDefinitions>
        <!--Top-->
        <DockPanel Grid.Row="0" Grid.Column="0" Grid.ColumnSpan="2" Background="#126A74" Height="60">
            <TextBlock Text="WPF中文网应用程序" Foreground="White" FontSize="20" Margin="15,15"/>
            <StackPanel Orientation="Horizontal" HorizontalAlignment="Right">
                <Border Height="35" Margin="10"  BorderThickness="1" BorderBrush="#CA5100" Background="#CA5100" CornerRadius="10">
                    <TextBlock  Text="退出系统" Foreground="White" HorizontalAlignment="Center" VerticalAlignment="Center" Margin="10 0 10 0"/>
                </Border>
            </StackPanel>
        </DockPanel>
        <!--left-->
        <StackPanel Grid.Row="1" Grid.Column="0" Width="350">
            <Border Height="250" Margin="10" Padding="5"  Background="#439D84">
                <TextBlock  Text="参数区域" Margin="5" HorizontalAlignment="Center" VerticalAlignment="Center" Foreground="White" FontSize="16"/>
            </Border>
            <Border Height="250" Margin="10" Padding="5"  Background="#9CDC7B">
                <TextBlock  Text="参数区域" Margin="5" HorizontalAlignment="Center" VerticalAlignment="Center" Foreground="White" FontSize="16"/>
            </Border>
            <Border Height="110" Margin="10" Padding="5"  Background="#E97752">
                <TextBlock  Text="参数区域" Margin="5" HorizontalAlignment="Center" VerticalAlignment="Center" Foreground="White" FontSize="16"/>
            </Border>
        </StackPanel>
        <!--right-->
        <Grid Grid.Row="1" Grid.Column="1">
            <Border Margin="10" Padding="5" BorderThickness="1" BorderBrush="#F7BD93" CornerRadius="5" Background="#FDD2B2">
                <TextBlock  Text="主体区域" Margin="5" />
            </Border>
            <Border Width="150" Height="150" Margin="10" Padding="5" BorderThickness="1"  Background="Red" BorderBrush="Gray" CornerRadius="75">
                <TextBlock  Text="开始运行" Margin="5" HorizontalAlignment="Center"  FontSize="16" FontWeight="Bold" VerticalAlignment="Center" Foreground="White"/>
            </Border>
        </Grid>
        <!--bottom-->
        <Grid  Grid.Row="2" Grid.Column="0" Grid.ColumnSpan="2" Background="#CA5100">
            <TextBlock Text="版本:1.0.2.5  |  版权所有:中国WPF中文网科技有限公司  www.wpfsoft.com" Margin="10 5 10 5" Foreground="White"/>
        </Grid>
    </Grid>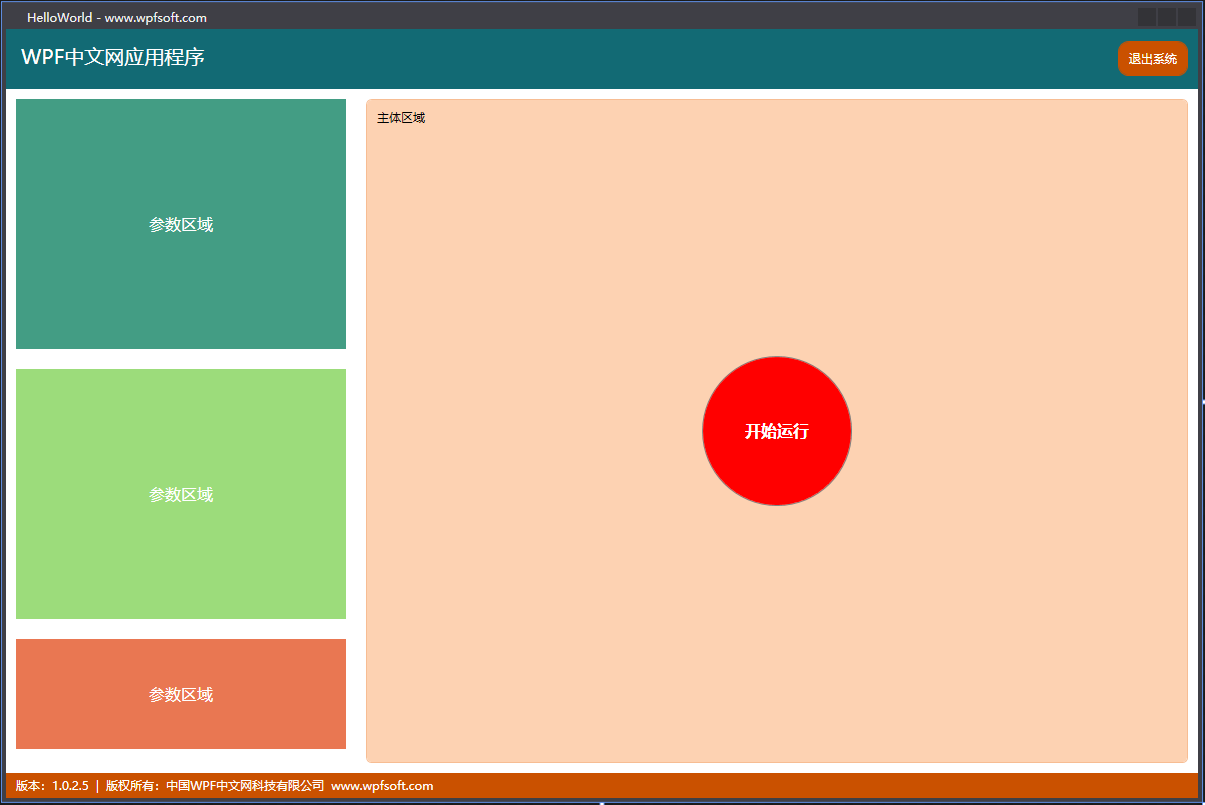
我们通过Grid栅格布局出界面的主要区域,然后给每个区域进行二次布局,比如Top区域,我们DockPanel和StackPanel的组合,设计成左右两个子区域,左边是应用程序的名称,右边是退出按钮。
中间区域,分为两部分组成,左边是一个StackPanel,里面有一个Border,右边是一个Grid。(注:左侧的StackPanel改成Grid的效果会更好哦)
底部区域是一个Grid,和一个TextBlock内容控件。好,我们布局控件的内容就先介绍到这里,在后续的章节中, 我们还会给出更多的例子来诠释WPF的其它知识点,而这些知识都有可能用以布局控件,所以,我们还会进一步学习布局控件的实战。
当前课程源码下载:(注明:本站所有源代码请按标题搜索)
文件名:014-《WPF布局Demo示例》-源代码
链接:https://pan.baidu.com/s/1yu-q4tUtl0poLVgmcMfgBA
提取码:wpff
若文章对您有帮助,可以激励一下我哦,祝您平安幸福!
| 微信 | 支付宝 |
|---|---|
 |
 |