ObservableCollection<T>泛型集合是一个经常使用的集合,表示一个动态数据集合,它可在添加、删除项目或刷新整个列表时提供通知。它继承了INotifyCollectionChanged和INotifyPropertyChanged,表示它在元素数量发生变化时,前端界面也会同步发生变化。
一、ObservableCollection<T>的定义
public class ObservableCollection<T> : Collection<T>, INotifyCollectionChanged, INotifyPropertyChanged
{
    public ObservableCollection();
    public ObservableCollection(List<T> list);
    public ObservableCollection(IEnumerable<T> collection);

    public event NotifyCollectionChangedEventHandler CollectionChanged;
    protected event PropertyChangedEventHandler PropertyChanged;

    public void Move(int oldIndex, int newIndex);
    protected IDisposable BlockReentrancy();
    protected void CheckReentrancy();
    protected override void ClearItems();
    protected override void InsertItem(int index, T item);
    protected virtual void MoveItem(int oldIndex, int newIndex);
    protected virtual void OnCollectionChanged(NotifyCollectionChangedEventArgs e);
    protected virtual void OnPropertyChanged(PropertyChangedEventArgs e);
    protected override void RemoveItem(int index);
    protected override void SetItem(int index, T item);

}
它除了继承两个属性通知接口,还继承了一大波的接口,例如:IList, ICollection, IEnumerable, IEnumerable, IList, ICollection, IReadOnlyList, IReadOnlyCollection。所以,它拥有List集合同等的功能,而且,ObservableCollection还可以很方便的转换成List集合。
二、ObservableCollection示例
我们来创建一个ObservableCollection集合,利用之前学过的ListView控件,演示一下这个集合的功能。
前端代码
<Window x:Class="HelloWorld.MainWindow"
        xmlns="http://schemas.microsoft.com/winfx/2006/xaml/presentation"
        xmlns:x="http://schemas.microsoft.com/winfx/2006/xaml"
        xmlns:d="http://schemas.microsoft.com/expression/blend/2008"
        xmlns:mc="http://schemas.openxmlformats.org/markup-compatibility/2006"
        xmlns:local="clr-namespace:HelloWorld"
        xmlns:forms="clr-namespace:System.Windows.Forms;assembly=System.Windows.Forms"
        mc:Ignorable="d" FontSize="14"
        Title="WPF中文网之数据绑定 - www.wpfsoft.com" Height="350" Width="500">
    <Grid>
        <Grid.ColumnDefinitions>
            <ColumnDefinition/>
            <ColumnDefinition Width="200"/>
        </Grid.ColumnDefinitions>
        <ListView ItemsSource="{Binding Persons}" SelectedItem="{Binding Person}">
            <ListView.View>
                <GridView>
                    <GridViewColumn Header="姓名" DisplayMemberBinding="{Binding Name}" Width="60"/>
                    <GridViewColumn Header="年龄" DisplayMemberBinding="{Binding Age}" Width="auto"/>
                    <GridViewColumn Header="地址" DisplayMemberBinding="{Binding Address}" Width="auto"/>
                </GridView>
            </ListView.View>
        </ListView>
        <StackPanel Grid.Column="1" x:Name="panel" VerticalAlignment="Center" Margin="5,0">
            <StackPanel Orientation="Horizontal">
                <TextBlock Text="姓名:" Margin="5"/>
                <TextBox Text="{Binding Person.Name,UpdateSourceTrigger=PropertyChanged}" Width="145" Height="25"/>
            </StackPanel>
            <StackPanel Orientation="Horizontal">
                <TextBlock Text="年龄:" Margin="5"/>
                <TextBox Text="{Binding Person.Age,UpdateSourceTrigger=LostFocus}" Width="145" Height="25"/>
            </StackPanel>
            <StackPanel Orientation="Horizontal">
                <TextBlock Text="地址:" Margin="5"/>
                <TextBox Text="{Binding Person.Address,UpdateSourceTrigger=Default}" Width="145" Height="25"/>
            </StackPanel>
            <TextBlock Margin="5" >
                <Run Text="姓名:"/>
                <Run Text="{Binding Person.Name}"/>
            </TextBlock>
            <TextBlock Margin="5" >
                <Run Text="年龄:"/>
                <Run Text="{Binding Person.Age}"/>
            </TextBlock>
            <TextBlock Margin="5" >
                <Run Text="住址:"/>
                <Run Text="{Binding Person.Address}"/>
            </TextBlock>
            <Button Content="增加用户" Click="Button_Click" Margin="5,0"/>
        </StackPanel>
    </Grid>

</Window>
后端代码
using System;
using System.Collections.Generic;
using System.Collections.ObjectModel;
using System.ComponentModel;
using System.IO;
using System.Runtime.CompilerServices;
using System.Windows;
using System.Windows.Controls;
using System.Windows.Threading;

namespace HelloWorld
{
    public class ObservableObject : INotifyPropertyChanged
    {
        public event PropertyChangedEventHandler PropertyChanged;

        public void RaisePropertyChanged([CallerMemberName] string propertyName = "")
        {
            PropertyChanged?.Invoke(this, new PropertyChangedEventArgs(propertyName));
        }
    }
    public class Person : ObservableObject
    {
        private string name;
        public string Name
        {
            get { return name; }
            set { name = value;RaisePropertyChanged(); }
        }

        private int age;
        public int Age
        {
            get { return age; }
            set { age = value; RaisePropertyChanged(); }
        }

        private string address;
        public string Address
        {
            get { return address; }
            set { address = value; RaisePropertyChanged(); }
        }
    }

    public class MainViewModel : ObservableObject
    {
        private Person person;
        public Person Person
        {
            get { return person; }
            set { person = value; RaisePropertyChanged(); }
        }

        public ObservableCollection<Person> Persons { get; set; } = new ObservableCollection<Person>();
        public MainViewModel()
        {

        }
    }

    /// <summary>
    /// MainWindow.xaml 的交互逻辑
    /// </summary>
    public partial class MainWindow : Window
    {
        public MainWindow()
        {
            InitializeComponent();

            this.DataContext = new MainViewModel();
        }

        private void Button_Click(object sender, RoutedEventArgs e)
        {
            var vm = DataContext as MainViewModel;

            if (vm == null) return;

            Person person = new Person();
            person.Name = "新人";
            person.Age = new Random().Next(1, 100);
            person.Address = DateTime.Now.ToString();

            vm.Persons.Add(person);
        }
    }
}
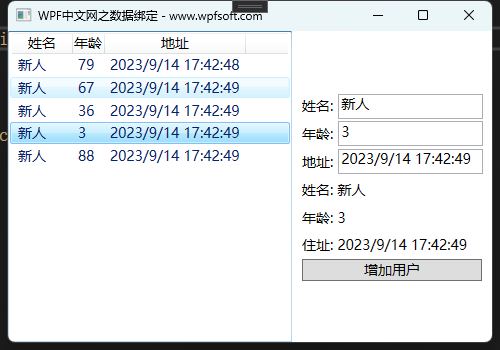
当增加用户时,向Persons集合中增加一个Person对象,此时,前端的ListView便会同步增加一个用户。
当前课程源码下载:(注明:本站所有源代码请按标题搜索)
文件名:054-《ObservableCollection泛型集合》-源代码
链接:https://pan.baidu.com/s/1yu-q4tUtl0poLVgmcMfgBA
提取码:wpff
——重庆教主 2023年9月14日
INotifyPropertyChanged接口,通知客户端属性值已更改。
public interface INotifyPropertyChanged
{
    event PropertyChangedEventHandler PropertyChanged;
}
这个接口只有一个PropertyChanged事件,该事件专门用来触发属性更改通知。通常情况下,我们会单独编写一个服务类(例如ObservableObject),以实现INotifyPropertyChanged接口的业务。这样做的好处是,将来的ViewModel、Model都可以继承这个ObservableObject,从而调用属性通知接口。
一、实现INotifyPropertyChanged接口
public class ObservableObject : INotifyPropertyChanged
{
    public event PropertyChangedEventHandler PropertyChanged;

    public void RaisePropertyChanged([CallerMemberName] string propertyName = "")
    {
        PropertyChanged?.Invoke(this, new PropertyChangedEventArgs(propertyName));
    }
}
使用了CallerMemberName特性后,就不必再传入属性名字符串。
接下来,我们来编写一个ViewModel和一个Model,让它们都继承这个属性通知基类。
Person实体
public class Person : ObservableObject
{
    private string name;
    public string Name
    {
        get { return name; }
        set { name = value;RaisePropertyChanged(); }
    }

    private int age;
    public int Age
    {
        get { return age; }
        set { age = value; RaisePropertyChanged(); }
    }

    private string address;
    public string Address
    {
        get { return address; }
        set { address = value; RaisePropertyChanged(); }
    }
}
MainViewModel实体
public class MainViewModel : ObservableObject
{
    private Person person;
    public Person Person
    {
        get { return person; }
        set { person = value; RaisePropertyChanged(); }
    }

    public MainViewModel()
    {
        person = new Person
        {
            Name = "张三",
            Age = 50,
            Address = "居无定所",
        };
    }
}
我们修改了前面章节中的Person和MainViewModel两个类型,其中所有的属性都写成了完整的属性包装器形式,并在set语句块中增加了RaisePropertyChanged()方法成员的调用。
首先分析Person类,当修改Name、Age、Address属性时,调用RaisePropertyChanged(),此时如果前端UI有这几个属性的绑定,将会立即被更新内容。
然后是MainViewModel,这里的Person属性被重新赋值时,也将会通知到前端。如果MainViewModel中这个Person没有实现属性通知,那么,Person中的Name、Age、Address属性发生更改时,前端UI的内容会发生同步更新,但是,如果对Person属性本身重新赋值,前端UI是不会发生改变的。这一点细节需要了解清楚哦。
二、数据绑定示例
前端代码
<Window x:Class="HelloWorld.MainWindow"
        xmlns="http://schemas.microsoft.com/winfx/2006/xaml/presentation"
        xmlns:x="http://schemas.microsoft.com/winfx/2006/xaml"
        xmlns:d="http://schemas.microsoft.com/expression/blend/2008"
        xmlns:mc="http://schemas.openxmlformats.org/markup-compatibility/2006"
        xmlns:local="clr-namespace:HelloWorld"
        xmlns:forms="clr-namespace:System.Windows.Forms;assembly=System.Windows.Forms"
        mc:Ignorable="d" FontSize="14"
        Title="WPF中文网之数据绑定 - www.wpfsoft.com" Height="350" Width="500">
    <StackPanel x:Name="panel" VerticalAlignment="Center" Margin="80,0">
        <StackPanel Orientation="Horizontal">
            <TextBlock Text="姓名:" Margin="5"/>
            <TextBox Text="{Binding Person.Name,UpdateSourceTrigger=PropertyChanged}" Width="200" Height="25"/>
        </StackPanel>
        <StackPanel Orientation="Horizontal">
            <TextBlock Text="年龄:" Margin="5"/>
            <TextBox Text="{Binding Person.Age,UpdateSourceTrigger=LostFocus}" Width="200" Height="25"/>
        </StackPanel>
        <StackPanel Orientation="Horizontal">
            <TextBlock Text="地址:" Margin="5"/>
            <TextBox Text="{Binding Person.Address,UpdateSourceTrigger=Default}" Width="200" Height="25"/>
        </StackPanel>
        <TextBlock Margin="5" >
                <Run Text="姓名:"/>
                <Run Text="{Binding Person.Name}"/>
        </TextBlock>
        <TextBlock Margin="5" >
                <Run Text="年龄:"/>
                <Run Text="{Binding Person.Age}"/>
        </TextBlock>
        <TextBlock Margin="5" >
                <Run Text="住址:"/>
                <Run Text="{Binding Person.Address}"/>
        </TextBlock>
        <Button Content="随机更改内容" Click="Button_Click"/>
    </StackPanel>
</Window>
后端代码
using System;
using System.Collections.Generic;
using System.ComponentModel;
using System.IO;
using System.Runtime.CompilerServices;
using System.Windows;
using System.Windows.Controls;
using System.Windows.Threading;

namespace HelloWorld
{
    public class ObservableObject : INotifyPropertyChanged
    {
        public event PropertyChangedEventHandler PropertyChanged;

        public void RaisePropertyChanged([CallerMemberName] string propertyName = "")
        {
            PropertyChanged?.Invoke(this, new PropertyChangedEventArgs(propertyName));
        }
    }
    public class Person : ObservableObject
    {
        private string name;
        public string Name
        {
            get { return name; }
            set { name = value;RaisePropertyChanged(); }
        }

        private int age;
        public int Age
        {
            get { return age; }
            set { age = value; RaisePropertyChanged(); }
        }

        private string address;
        public string Address
        {
            get { return address; }
            set { address = value; RaisePropertyChanged(); }
        }
    }

    public class MainViewModel : ObservableObject
    {
        private Person person;
        public Person Person
        {
            get { return person; }
            set { person = value; RaisePropertyChanged(); }
        }

        public MainViewModel()
        {
            person = new Person
            {
                Name = "张三",
                Age = 50,
                Address = "居无定所",
            };
        }
    }

    /// <summary>
    /// MainWindow.xaml 的交互逻辑
    /// </summary>
    public partial class MainWindow : Window
    {
        public MainWindow()
        {
            InitializeComponent();

            this.DataContext = new MainViewModel();
        }

        private void Button_Click(object sender, RoutedEventArgs e)
        {
            var vm = DataContext as MainViewModel;

            if (vm == null) return;

            vm.Person.Age = new Random().Next(1, 100);
            vm.Person.Address = DateTime.Now.ToString();
        }
    }
}
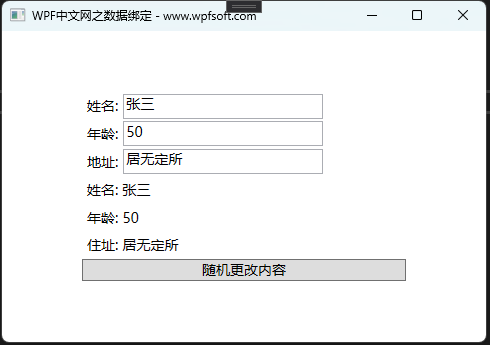
在上面的例子中,我们在主窗体的构造函数中实例化了一个MainViewModel,并赋值给了DataContext。在前端代码中,我们分别用TextBlock和TextBox绑定了MainViewModel的Person对象。当在TextBox中改变内容时,可以看到下面的TextBlock的内容也会同步更新,注意UpdateSourceTrigger的不同用法。
在按钮的单击事件中,我们从DataContext属性中将MainViewModel取出来,并在后端修改了Person的Age和Address,与此同时,前端的显示也会同步更新。说明我们的属性通知起了作用。
除了INotifyPropertyChanged接口可以实现属性通知,还有一个接口也可以实现属性通知,它就是INotifyCollectionChanged。它的作用是:当添加和删除项或清除整个列表时,向侦听器通知动态更改。也就是说,它是专门来解决集合的元素数量发生变化时的通知问题的。我们在下一节来演示它的用法。
当前课程源码下载:(注明:本站所有源代码请按标题搜索)
文件名:053-《INotifyPropertyChanged接口》-源代码
链接:https://pan.baidu.com/s/1yu-q4tUtl0poLVgmcMfgBA
提取码:wpff
——重庆教主 2023年9月14日
Binding类架起了控件和ViewModel之间的桥梁,它就像一个媒婆,指示了哪个控件的哪个属性与哪个ViewModel类的哪个属性建立绑定关系。提供对绑定定义的高级访问,该绑定连接绑定目标对象(通常为 WPF 元素)的属性和任何数据源(例如数据库、XML 文件,或包含数据的任何对象)。
一、Binding类的定义
public class Binding : BindingBase
{
    public const string IndexerName = "Item[]";
    public static readonly RoutedEvent SourceUpdatedEvent;
    public static readonly RoutedEvent TargetUpdatedEvent;
    public static readonly DependencyProperty XmlNamespaceManagerProperty;
    public static readonly object DoNothing;

    public Binding();
    public Binding(string path);

    public UpdateSourceTrigger UpdateSourceTrigger { get; set; }
    public bool NotifyOnSourceUpdated { get; set; }
    public bool NotifyOnTargetUpdated { get; set; }
    public bool NotifyOnValidationError { get; set; }
    public IValueConverter Converter { get; set; }
    public object ConverterParameter { get; set; }
    public CultureInfo ConverterCulture { get; set; }
    public object Source { get; set; }
    public RelativeSource RelativeSource { get; set; }
    public string ElementName { get; set; }
    public bool IsAsync { get; set; }
    public object AsyncState { get; set; }
    public BindingMode Mode { get; set; }
    public string XPath { get; set; }
    public bool ValidatesOnDataErrors { get; set; }
    public bool ValidatesOnNotifyDataErrors { get; set; }
    public bool BindsDirectlyToSource { get; set; }
    public bool ValidatesOnExceptions { get; set; }
    public Collection<ValidationRule> ValidationRules { get; }
    public PropertyPath Path { get; set; }
    public UpdateSourceExceptionFilterCallback UpdateSourceExceptionFilter { get; set; }

    public static void AddSourceUpdatedHandler(DependencyObject element, EventHandler<DataTransferEventArgs> handler);
    public static void AddTargetUpdatedHandler(DependencyObject element, EventHandler<DataTransferEventArgs> handler);
    public static XmlNamespaceManager GetXmlNamespaceManager(DependencyObject target);
    public static void RemoveSourceUpdatedHandler(DependencyObject element, EventHandler<DataTransferEventArgs> handler);
    public static void RemoveTargetUpdatedHandler(DependencyObject element, EventHandler<DataTransferEventArgs> handler);
    public static void SetXmlNamespaceManager(DependencyObject target, XmlNamespaceManager value);
    public bool ShouldSerializePath();
    public bool ShouldSerializeSource();
    public bool ShouldSerializeValidationRules();

}
接下来,我们重点分析一下Binding类提供了哪些重要的属性,这些属性在实际使用过程中,代表什么意思。
二、Binding的数据源
首先,控件的属性与Model的属性建立绑定,我们将Model及其属性称为数据源,而数据源大致可以分为以下4种方式进行绑定。
第一种数据源,也就是ViewModel中的Model。在写法上直接如下所示:
Text="{Binding Person.Name}"这里实例化了一个Binding对象,后面紧跟的Person.Name表示一个Path路径,指的是当前的DataContext中那个ViewModel对象的Person.Name,注意看,Binding的有一个带参数的构造函数:public Binding(string path);实际上,就是将Person.Name路径传给了path形参。
第二种数据源,指明某个具体的数据源对象及对象的属性。这种绑定方式要用了Binding类的Source属性和Path属性。通常写法如下:
Text="{Binding Source={StaticResource RedBrush},Path=Color}"在这里,Source属性表示数据源对象,它是一个静态资源对象,Path=Color表示要绑定这个静态资源对象的Color属性。我们已经提前在资源里定义好了这个资源对象。资源对象的实例名叫RedBrush,它确实也有一个叫Color的属性。
<Window.Resources>
    <SolidColorBrush x:Key="RedBrush" Color="Red"/>
</Window.Resources>
这样绑定的效果如下图所示。
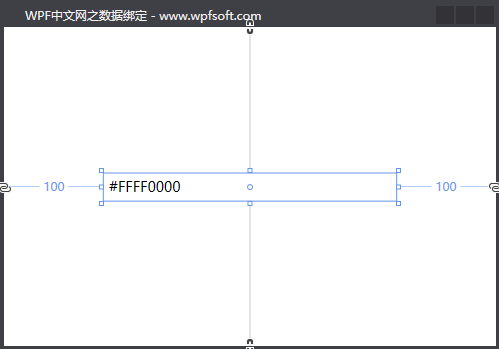
看起来Color=Red,实则是一个代表颜色的16进制字符串。
第三种数据源,利用ElementName属性指明另一个控件作为数据源,这里仍然要用到Path来指定另一个控件的某个属性路径。
<StackPanel x:Name="panel" VerticalAlignment="Center" Margin="100,0">
    <TextBlock Margin="5">
        <Run Text="Source示例:"/>
        <Run Text="{Binding Source={StaticResource RedBrush},Path=Color}"/>
    </TextBlock>
    <TextBlock Margin="5">
        <Run Text="ElementName示例:"/>
        <Run Text="{Binding ElementName=panel,Path=Margin}"/>
    </TextBlock>
</StackPanel>
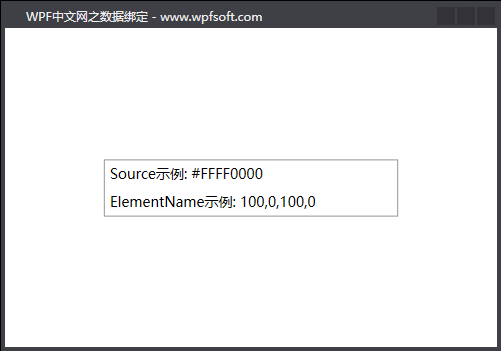
通过Binding类的ElementName去指定当前XAML中的另一个StackPanel控件,并绑定其Margin属性,这样,TextBlock就显示了StackPanel控件的Margin属性值。
第四种数据源,利用RelativeSource属性绑定一个相对的数据源。这种绑定方式也经常使用,且实用价值很高,作为开发者,一定要掌握它的用法。
<StackPanel x:Name="panel" VerticalAlignment="Center" Margin="80,0">
    <TextBlock Margin="5">
        <Run Text="Source示例:"/>
        <Run Text="{Binding Source={StaticResource RedBrush},Path=Color}"/>
    </TextBlock>
    <TextBlock Margin="5">
        <Run Text="ElementName示例:"/>
        <Run Text="{Binding ElementName=panel,Path=Margin}"/>
    </TextBlock>
    <TextBlock Margin="5">
        <Run Text="RelativeSource示例:"/>
        <Run Text="{Binding RelativeSource={RelativeSource Mode=Self},Path=Foreground}"/>
        <Run Text="{Binding RelativeSource={RelativeSource Mode=FindAncestor,AncestorType=StackPanel},Path=Margin}"/>
    </TextBlock>
</StackPanel>
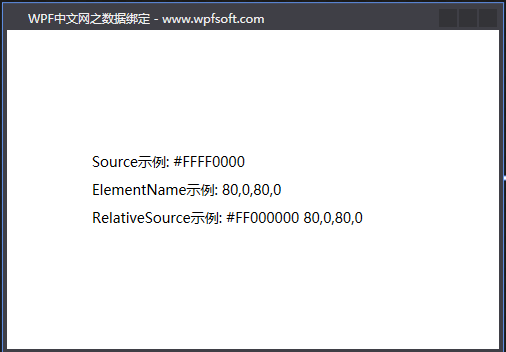
RelativeSource类有3个重要的属性,它们分别是Mode、AncestorType和AncestorLevel。
Mode:表示寻找相对数据源的模式,一共有4种模式
| 模式 | 说明 |
| PreviousData | 允许在当前显示的数据项列表中绑定上一个数据项(不是包含数据项的控件)。 |
| TemplatedParent | 引用应用了模板的元素,其中此模板中存在数据绑定元素。 |
| Self | 引用正在其上设置绑定的元素,并允许你将该元素的一个属性绑定到同一元素的其他属性上。 |
| FindAncestor | 引用数据绑定元素的父链中的上级。 这可用于绑定到特定类型的上级或其子类。 |
在上面的例子中,我们演示了Self(自身控件)和FindAncestor(找上级控件)两种模式。
AncestorType:当Mode=FindAncestor时,这时就要指示要找的这个上级是什么类型,AncestorType用来表示上级的类型。
AncestorLevel:获取或设置要查找的上级级别。 使用 1 指示最靠近绑定目标元素的项。
Text="{Binding RelativeSource={RelativeSource Mode=Self},Path=Foreground}"表示将自己的前景色显示到Text属性上。
Text="{Binding RelativeSource={RelativeSource Mode=FindAncestor,AncestorType=StackPanel},Path=Margin}"表示从当前控件开始找上级,一个类型为StackPanel的控件,并把这个StackPanel控件的Margin显示到当前控件的Text属性上。
三、Binding的绑定模式
当一个实体的属性绑定到控件的属性之后,还需要指明这两者之间的绑定关系。这个就是Binding类的Mode属性,Mode属性是一个枚举类型。它有如下几个情况。
| 枚举值 | 说明 |
| TwoWay | 双向绑定,即导致更改源属性或目标属性时自动更新另一方。 |
| OneWay | 单向绑定,在更改绑定源(源)时更新绑定目标(目标)。 |
| OneTime | 一次绑定,在应用程序启动或数据上下文更改时,更新绑定目标。 |
| OneWayToSource | 在目标属性更改时,更新源属性。 |
| Default | 默认绑定,文本框的默认绑定是双向的,而其他大多数属性默认为单向绑定。 |
这里面常用的是OneWay和TwoWay。如果是TwoWay(双向绑定),意味着前端控件的属性改变时,后端的Model也跟着改变,反之亦然。就拿前端改变去影响后端的Model值来说,这里会多出来一个概念——改变时机。
什么是改变时机?其实就是如果前端的值发生改变,后端的值在什么时候跟着改变。它由Binding类的UpdateSourceTrigger属性的值决定 。这个属性也是一个枚举类型。
| 枚举值 | 说明 |
| Default | 采用控件各自的UpdateSourceTrigger默认值。 |
| PropertyChanged | 每当绑定目标属性发生更改时,都会更新绑定源。 |
| LostFocus | 每当绑定目标元素失去焦点时,都会更新绑定源。 |
| Explicit | 仅在调用 System.Windows.Data.BindingExpression.UpdateSource 方法时更新绑定源。 |
TextBox.Text 属性的默认值为 LostFocus,我们经常会把TextBox的UpdateSourceTrigger改成PropertyChanged,即文本框在输入内容时,实时的更新后端的Model属性值。
前端属性值发生改变后,由UpdateSourceTrigger决定什么时候更新后端的Model属性值,但是,后端那些Model的属性值发生改变后,前端什么时候跟着改变?需不需要做特殊的处理?
答案是需要!如果Model中的那些属性没有实现属性通知,就算前后端成功的建立了绑定关系,后端Model属性值改变时,前端的显示是没有变化的,如果要实时跟着变化,则需要掌握WPF的INotifyPropertyChanged接口以及属性通知的相关知识点。
关于INotifyPropertyChanged接口,我们将在下一节讲解。
当前课程源码下载:(注明:本站所有源代码请按标题搜索)
文件名:052-《Binding(绑定)》-源代码
链接:https://pan.baidu.com/s/1yu-q4tUtl0poLVgmcMfgBA
提取码:wpff
——重庆教主 2023年9月14日
DataContext是FrameworkElement基类的一个属性。其含义:获取或设置元素参与数据绑定时的数据上下文。通常情况下,我们把它设计成一个class——也就是所谓的ViewModel。
那么,什么是ViewModel?这一切,还要从WPF的MVVM模式说起。
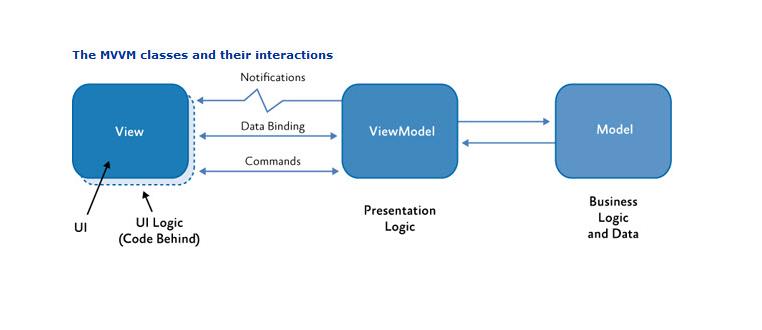
如图所示,WPF将程序划分为3个部分,分别是View(UI界面或视图)、ViewModel(视图模型)、Model(数据模型)。
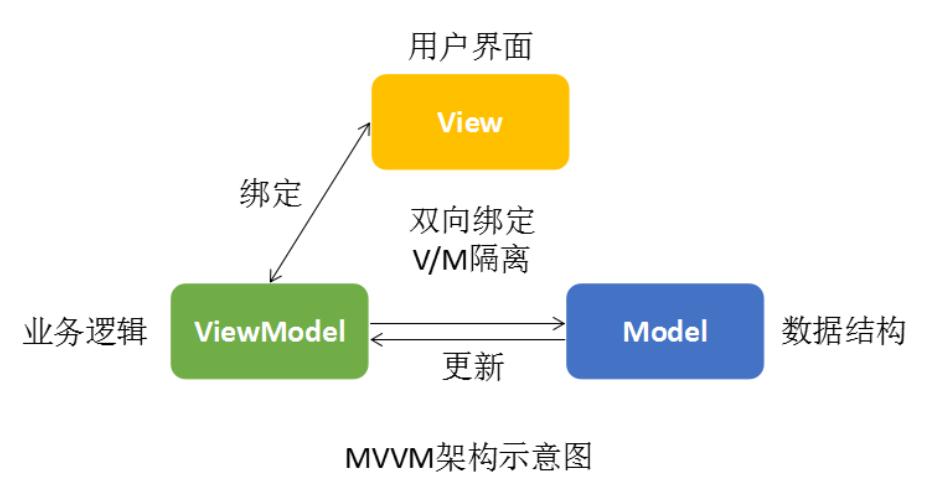
View负责数据的输入与输出;ViewModel负责业务逻辑;Model则表示程序中具体要处理的数据。所以,Model将作为属性存在于ViewModel中,而Model最终是要显示在Ul界面(View)上的,怎么办呢?将ViewModel赋值给View的DataContext(数据上下文)属性,View就可以引用ViewModel中的那些Model了。
总结:Model在ViewModel中,ViewModel在View的DataContext中,View引用Model。
Model和ViewModel都需要开发者自己实现,而哪些View拥有DataContext属性?WPF所有的控件(包括Window窗体)都有DataContext属性,因为它们都继承于FrameworkElement基类。
重庆教主说
通常一个Window窗体中有很多控件,我们只需要给Window的DataContext赋值一个ViewModel,窗体中其它的控件的DataContext会共享Window的DataContext。
只有将ViewModel赋值到DataContext之后,才可以实现数据绑定。接下来,我们写一个简单的例子演示Model、ViewModel、DataContext属性。
Model类
public class Person
{
    public string Name { get; set; }
    public int Age { get; set; }
    public string Address { get; set; }

}
ViewModel类
public class MainViewModel
{
    public Person Person { get; set; }

    public MainViewModel()
    {
        Person = new Person
        {
            Name = "张三",
            Age = 50,
            Address = "居无定所",
        };
    }
}
DataContext属性赋值
public partial class MainWindow : Window
{
    public MainWindow()
    {
        InitializeComponent();

        this.DataContext = new MainViewModel();
    }
}
我们给MainWindow主窗体的DataContext赋值了一个叫MainViewModel的视图模型。而MainViewModel中有一个叫Person的属性,它就代表了程序运行中要处理的数据实体。
现在MainWindow的DataContext(数据上下文)有了一个对象后,我们怎么将这个Person属性显示到前端呢,这需要使用Binding——数据绑定。
下一节,我们来介绍Binding数据绑定。
——重庆教主 2023年9月14日
在前面的章节中,我们学习了各式各样的控件,这些控件拥有许多的属性,比如它们的基类FrameworkElement,它有Width(宽度)和Height(高度)。如果我们要改变控件的宽度或高度,有两种办法。
第一种,在XAML中修改属性值
<Button x:Name="button" Content="确定" Width="100" Height="30"/>第二种,在C#代码中修改属性值
button.Width = 100;
button.Height = 30;
那么,还有没有第三种办法呢?——答案就是数据绑定。根据官方的定义,数据绑定是在应用 UI 与其显示的数据之间建立连接的过程。 如果绑定具有正确的设置,并且数据提供适当的通知,则在数据更改其值时,绑定到该数据的元素会自动反映更改。 数据绑定还意味着,如果元素中数据的外部表示形式发生更改,则基础数据可以自动进行更新以反映更改。
简单点说,我们可以定义一个ViewModel,将ViewModel中的属性绑定(Binding)到控件上的属性,ViewModel的属性改变时,控件的属性也跟着改变,反过来说,控件的属性改变时,ViewModel的属性也会改变。
这就是数据绑定!
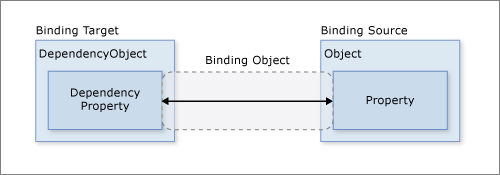
上图中演示了数据绑定的关系。
图的左边是一个DependencyObject对象,表明它是一个依赖对象。那么,WPF控件是不是一个DependencyObject对象?是的,因为WPF所有的控件都继承了DependencyObject基类。
图的右边是一个普通的对象,所以这里标注成object类型。右边的对象表示绑定的数据源——也就是一个ViewModel。
好,左边的是控件,右边的是数据源。中间是什么?中间是一座桥梁——也就是Binding对象。它就像是一个媒婆,成就了一桩又一桩良好的姻缘。
重点来了
1、控件的属性一定是依赖属性。
2、ViewModel的属性一定要实现属性通知。
3、控件自带媒婆——Binding。
4、媒婆只能在控件的DataContext(数据上下文)中找数据源。
接下来,我们将从第4点开始讲解,也就是DataContext(数据上下文)是个什么东西?它有哪些作用?
——重庆教主 2023年9月14日
 WPF中文网