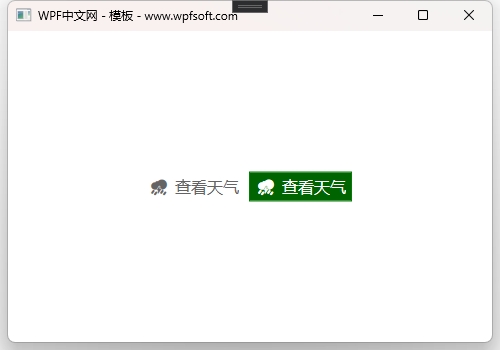
我们以Button按钮为例,演示其模板和样式的用法。首先我们定义两个样式,并在样式中定义了Button的控件模板(ControlTemplate)。
第一个样式
<Style x:Key="ButtonIconStyle" TargetType="Button">
    <Setter Property="Background"  Value="Transparent"/>
    <Setter Property="Foreground" Value="#646464"/>
    <Setter Property="FontSize" Value="16"/>
    <Setter Property="Height" Value="30"/>
    <Setter Property="Template">
        <Setter.Value>
            <ControlTemplate TargetType="Button">
                <Border Background="{TemplateBinding Background}"
                        CornerRadius="5"
                        Margin="0"
                        Height="{TemplateBinding Height}">
                    <Grid HorizontalAlignment="Center"
                          VerticalAlignment="Center">
                        <Grid.ColumnDefinitions>
                            <ColumnDefinition Width="auto"/>
                            <ColumnDefinition/>
                        </Grid.ColumnDefinitions>
                        <TextBlock Grid.Column="0" Text="{TemplateBinding Tag}"
                                   FontSize="{TemplateBinding FontSize}"
                                   Foreground="{TemplateBinding Foreground}"
                                   Margin="5 5 5 5"
                                   HorizontalAlignment="Center"
                                   VerticalAlignment="Center"/>
                        <TextBlock Grid.Column="1"
                                   Text="{TemplateBinding Content}"
                                   FontSize="{TemplateBinding FontSize}"
                                   Foreground="{TemplateBinding Foreground}"
                                   Margin="0 5 5 5"
                                   HorizontalAlignment="Center"
                                   VerticalAlignment="Center"/>
                    </Grid>
                </Border>
                <ControlTemplate.Triggers>
                    <Trigger Property="IsMouseOver" Value="True">
                        <Setter Property="Background" Value="LightPink"/>
                    </Trigger>
                    <Trigger Property="IsMouseOver" Value="False">
                        <Setter Property="Background" Value="Transparent"/>
                    </Trigger>
                </ControlTemplate.Triggers>
            </ControlTemplate>
        </Setter.Value>
    </Setter>
</Style>
在上面的样式中,我们在Template属性中实例化了一个ControlTemplate控件模板,为Button的模板(可视化树)定义了一个Border装饰器,为了实现图文按钮效果,所以在里面实例化了一个Grid,以及两个TextBlock,使用TemplateBinding将Button的属性与可视化树中的控件的属性进行模板绑定,巧妙的利用Button的Tag属性作为图标显示。最后,在ControlTemplate中实例化了两个触发器,条件是鼠标移上去或移开,改变Button的背景颜色。
第二个样式
<Style x:Key="ButtonIconBorderStyle" TargetType="Button">
    <Setter Property="Background"  Value="Transparent"/>
    <Setter Property="Foreground" Value="#646464"/>
    <Setter Property="FontSize" Value="16"/>
    <Setter Property="Height" Value="30"/>
    <Setter Property="Margin" Value="5"/>
    <Setter Property="Template">
        <Setter.Value>
            <ControlTemplate TargetType="Button">
                <Border Background="{TemplateBinding Background}"
                        BorderBrush="{TemplateBinding BorderBrush}"
                        BorderThickness="{TemplateBinding BorderThickness}"
                        CornerRadius="0"
                        Margin="0"
                        Height="{TemplateBinding Height}">
                    <Grid HorizontalAlignment="Center"
                          VerticalAlignment="Center">
                        <Grid.ColumnDefinitions>
                            <ColumnDefinition Width="auto"/>
                            <ColumnDefinition/>
                        </Grid.ColumnDefinitions>
                        <TextBlock Grid.Column="0" Text="{TemplateBinding Tag}"
                                   FontSize="{TemplateBinding FontSize}"
                                   Foreground="{TemplateBinding Foreground}"
                                   Margin="5 5 5 5"
                                   HorizontalAlignment="Center"
                                   VerticalAlignment="Center"/>
                        <TextBlock Grid.Column="1"
                                   Text="{TemplateBinding Content}"
                                   FontSize="{TemplateBinding FontSize}"
                                   Foreground="{TemplateBinding Foreground}"
                                   Margin="0 5 5 5"
                                   HorizontalAlignment="Center"
                                   VerticalAlignment="Center"/>
                    </Grid>
                </Border>
                <ControlTemplate.Triggers>
                    <Trigger Property="IsMouseOver" Value="True">
                        <Setter Property="Background" Value="DarkGreen"/>
                        <Setter Property="BorderBrush" Value="Green"/>
                        <Setter Property="Foreground" Value="White"/>
                    </Trigger>
                    <Trigger Property="IsMouseOver" Value="False">
                        <Setter Property="Background" Value="Transparent"/>
                    </Trigger>
                </ControlTemplate.Triggers>
            </ControlTemplate>
        </Setter.Value>
    </Setter>
</Style>
我们在第一种样式的基础之上进行了细节优化,绑定了Button的边框到可视化树中的Border控件上,并优化了触发器的设置,从而形成不同的按钮呈现。最后我们来看一下两个按钮的呈现效果。

当前课程源码下载:(注明:本站所有源代码请按标题搜索)
文件名:070-《Button模板样式实战》-源代码
链接:https://pan.baidu.com/s/1yu-q4tUtl0poLVgmcMfgBA
提取码:wpff
——重庆教主 2023年10月9日
Button因为继承了ButtonBase,而ButtonBase又继承了ContentControl,所以,Button可以通过设置Content属性来设置要显示的内容。例如
<Button Content="WPF中文网"/>我们使用Button的时机,通常是鼠标点击事件需要有响应操作时,所以,Button的Click事件是最好的选择。接下来,我们先看看它的结构定义:
public class Button : ButtonBase
{
    public static readonly DependencyProperty IsDefaultProperty;
    public static readonly DependencyProperty IsCancelProperty;
    public static readonly DependencyProperty IsDefaultedProperty;

    public Button();

    public bool IsDefault { get; set; }
    public bool IsCancel { get; set; }
    public bool IsDefaulted { get; }

    protected override void OnClick();
    protected override AutomationPeer OnCreateAutomationPeer();

}
属性分析
| 属性 | 说明 |
| IsDefault | 用户通过按 ENTER 键时调用的默认按钮。 |
| IsCancel | 用户可以通过按 ESC 键来激活取消按钮。 |
| IsDefaulted | 获取按钮是否为按 ENTER 键时调用的默认按钮。 |
我们通过一个例子来分析Button控件的用法与特点。
前端代码
<Window x:Class="HelloWorld.MainWindow"
        xmlns="http://schemas.microsoft.com/winfx/2006/xaml/presentation"
        xmlns:x="http://schemas.microsoft.com/winfx/2006/xaml"
        xmlns:d="http://schemas.microsoft.com/expression/blend/2008"
        xmlns:mc="http://schemas.openxmlformats.org/markup-compatibility/2006"
        xmlns:local="clr-namespace:HelloWorld"
        mc:Ignorable="d"
        Title="HelloWorld - www.wpfsoft.com" Height="350" Width="500">
    <Button x:Name="_button"
            Content="退出"
            Width="100"
            Height="25"
            Click="_button_Click" IsDefault="True"/>
</Window>
后端代码
namespace HelloWorld
{
    /// <summary>
    /// MainWindow.xaml 的交互逻辑
    /// </summary>
    public partial class MainWindow : Window
    {
        public MainWindow()
        {
            InitializeComponent();
        }

        private void _button_Click(object sender, RoutedEventArgs e)
        {
            this.Close();
        }
    }
}
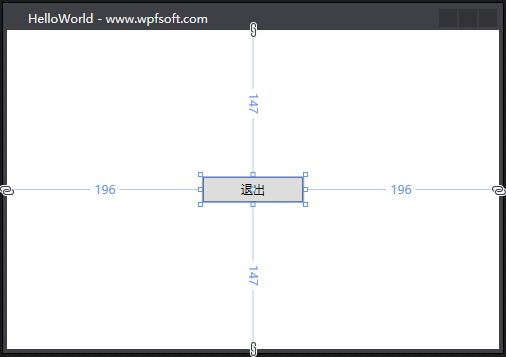
如上所示,我们在Window窗体中写了一个Button按钮,然后设置了一些属性,我们一一进行分析。
x:Name和Name的区别
第一个设置是x:Name="_button"。首先要解释x:Name是什么意思。在这里的x表示一个命令空间,也就是xmlns:x="http://schemas.microsoft.com/winfx/2006/xaml",Name指的是这个控件的名称。请注意,由于Button继承了FrameworkElement类,而FrameworkElement类也有一个Name属性,但是这里设置的x:Name="_button"并不是引用了FrameworkElement类的Name属性,而是指在xaml中为Button定义了一个叫“_button"的名称,并把这个“_button"映射到了Button的Name属性上,以便于我们在后端可以通过”_button“去引用这个按钮。
也就是说,如果某个控件本身也有一个Name属性,那么前端的x:Name就赋值给控件Name属性。
Content属性
这是ContentControl控件的内容属性,用来设置Button的显示内容,除了是字符串,也可以设置为其它内容,比如一个图标、一个其它元素。
Width属性
Width也不是Button本身的属性,而是FrameworkElement的宽度,由于Button继承了FrameworkElement,所以Width就成了按钮的宽度属性。
Height属性
与上面的Width类似,同属于FrameworkElement的高度属性,在此成了Button的高度属性。
Click事件
Click是一个事件,但不是Button的事件,而是它的基类ButtonBase的事件,事件和委托概念关系密切,因为要订阅一个事件,需要写一个回调函数,而这个回调函数的签名要和这个事件的声明委托签名保持一致。我们来看看Click的委托签名是什么样子的。
public delegate void RoutedEventHandler(object sender, RoutedEventArgs e);这个委托规定了回调函数的签名,第一,要求回调函数的返回值是void,第二,要求回调函数有两个参数,且参数1是object类型,参数2是RoutedEventArgs类型。于是,我们在后端代码中写了这样一个回调函数。
        private void _button_Click(object sender, RoutedEventArgs e)
        {
            this.Close();
        }
最后在前端,把这个回调函数的名称赋值给Click事件即可完成了在xaml代码中的事件订阅。
Click="_button_Click"IsDefault属性
这个属性是Button自身的属性,这里设置为true,表示这个button是一个默认按钮,我们按下F5启动程序后,直接按回车键,就相当于用鼠标点击了按钮,最终执行了回调函数里面的代码。即this.Close()语句。
this.Close()表示关闭当前窗体。
通过C#代码订阅事件
我们还可以通过C#代码提供的事件订阅符号+=去订阅事件,接下来,我们将上面的例子简单修改一下,去掉在xaml中的订阅方式,在后端代码的构造函数中订阅事件。
前端代码
<Button Name="_button"
        Content="退出"
        Width="100"
        Height="25"
        IsDefault="True"/>
后端代码
 /// <summary>
    /// MainWindow.xaml 的交互逻辑
    /// </summary>
    public partial class MainWindow : Window
    {
        public MainWindow()
        {
            InitializeComponent();
            _button.Click += _button_Click;
        }

        private void _button_Click(object sender, RoutedEventArgs e)
        {
            this.Close();
        }
    }
最后F5调试,效果是一模一样的。
当前课程源码下载:(注明:本站所有源代码请按标题搜索)
文件名:017-《Button按钮》-源代码
链接:https://pan.baidu.com/s/1yu-q4tUtl0poLVgmcMfgBA
提取码:wpff
——重庆教主 2023年8月23日
 WPF中文网