通过前面的模板样式相关知识的学习,接下来,我们选几个具有代表性的控件进行实战演练,以便灵活掌握WPF的模板和样式的应用。
第一步,创建一个数据实体
public class Sentence : ObservableObject
{
    private string content;
    public string Content
    {
        get { return content; }
        set { content = value; RaisePropertyChanged(); }
    }
}
第二步,将数据实体放到ViewModel中
public class MainViewModel : ObservableObject
{

    private ObservableCollection<Sentence> poetries = new ObservableCollection<Sentence>();
    public ObservableCollection<Sentence> Poetries
    {
        get { return poetries; }
        set { poetries = value; RaisePropertyChanged(); }
    }

    public MainViewModel()
    {
        Poetries.Add(new Sentence() { Content = "汉皇重色思倾国,御宇多年求不得。" });
        Poetries.Add(new Sentence() { Content = "杨家有女初长成,养在深闺人未识。" });
        Poetries.Add(new Sentence() { Content = "天生丽质难自弃,一朝选在君王侧。" });
        Poetries.Add(new Sentence() { Content = "回眸一笑百媚生,六宫粉黛无颜色。" });
        Poetries.Add(new Sentence() { Content = "春寒赐浴华清池,温泉水滑洗凝脂。" });
        Poetries.Add(new Sentence() { Content = "侍儿扶起娇无力,始是新承恩泽时。" });
        Poetries.Add(new Sentence() { Content = "云鬓花颜金步摇,芙蓉帐暖度春宵。" });
    }
}
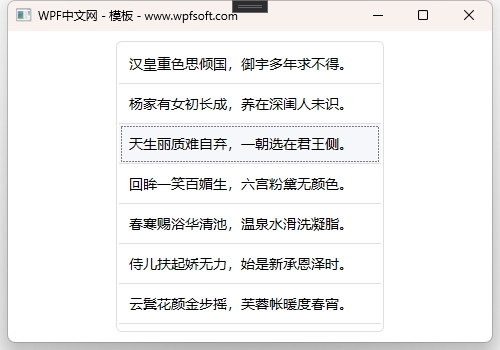
第三步,在XAML代码中实例化一个ListBox,并修改它的数据模板、样式和元素布局模板。
 <Grid>
     <Border Width="268"
             BorderBrush="#DFDFDF"
             BorderThickness="1"
             CornerRadius="5"
             Margin="10">
         <ListBox ItemsSource="{Binding Poetries}" >
             <ListBox.ItemTemplate>
                 <DataTemplate>
                     <Border>
                         <TextBlock Text="{Binding Content}"
                                    FontSize="14"
                                    Margin="10 5 10 5"/>
                     </Border>
                 </DataTemplate>
             </ListBox.ItemTemplate>
             <ListBox.Style>
                 <Style TargetType="ListBox">
                     <Setter Property="Focusable" Value="False"/>
                     <Setter Property="Padding" Value="0"/>
                     <Setter Property="Margin" Value="0"/>
                     <Setter Property="Background" Value="Transparent"/>
                     <Setter Property="BorderBrush" Value="Transparent"/>
                     <Setter Property="ItemContainerStyle">
                         <Setter.Value>
                             <Style TargetType="ListBoxItem">
                                 <Setter Property="Height" Value="40"/>
                                 <Setter Property="Template">
                                     <Setter.Value>
                                         <ControlTemplate TargetType="ListBoxItem">
                                             <Border Height="{TemplateBinding Height}"
                                                     BorderThickness="0 0 0 1"
                                                     BorderBrush="#DFDFDF"
                                                     Background="{TemplateBinding Background}">
                                                 <ContentPresenter VerticalAlignment="Center"/>
                                             </Border>
                                         </ControlTemplate>
                                     </Setter.Value>
                                 </Setter>
                                 <Style.Triggers>
                                     <Trigger Property="IsMouseOver" Value="True">
                                         <Setter Property="Background" Value="#F5F7FA"/>
                                     </Trigger>
                                     <Trigger Property="IsSelected" Value="True">
                                         <Setter Property="Background" Value="#F5F7FA"/>
                                     </Trigger>
                                 </Style.Triggers>
                             </Style>
                         </Setter.Value>
                     </Setter>
                 </Style>
             </ListBox.Style>
         </ListBox>
     </Border>
 </Grid>
在ListBoxItem中有一个IsSelected属性,表示当前项是否被选中。ListBoxItem作为ListBox的元素子项而存在,所以我们在ListBox列表控件中选中某一个项时,实际上是将当前项的IsSelected值为True。于是,就可以利用这个属性做一个触发器,当ListBoxItem被选中时,修改其背景颜色。
当前课程源码下载:(注明:本站所有源代码请按标题搜索)
文件名:069-《ListBox模板样式实战》-源代码
链接:https://pan.baidu.com/s/1yu-q4tUtl0poLVgmcMfgBA
提取码:wpff
——重庆教主 2023年10月7日
众所周知,ListBox继承于ItemsControl控件,那么,它就与ItemsControl一样,拥有了可以设置的数据模板。当然,它也可以拥有自己的控件模板(在Control基类中定义的Template)。这一节,我们只探讨一下ListBox如何使用数据模板。
我们可以将上一章节中的ItemsControl直接改成ListBox。
<ListBox ItemsSource="{Binding Persons}" >
    <ItemsControl.ItemsPanel>
        <ItemsPanelTemplate>
            <WrapPanel/>
        </ItemsPanelTemplate>
    </ItemsControl.ItemsPanel>
    <ItemsControl.ItemTemplate>
        <DataTemplate>
            <Border x:Name="border"
                    Width="280"
                    Height="200"
                    Margin="5"
                    BorderThickness="1"
                    BorderBrush="Gray">
                <Grid>
                    <Grid.RowDefinitions>
                        <RowDefinition/>
                        <RowDefinition/>
                    </Grid.RowDefinitions>
                    <StackPanel Grid.Row="0" Margin="20">
                        <TextBlock Text="{Binding Name}" FontWeight="Bold" FontSize="20"/>
                        <Rectangle Height="5"/>
                        <TextBlock Text="{Binding Occupation}" FontSize="16"/>
                    </StackPanel>
                    <StackPanel Grid.Row="1" Orientation="Horizontal">
                        <TextBlock Grid.Column="0" Text="☻"
                                       VerticalAlignment="Center"  Margin="20"
                                       FontSize="50" Foreground="#E26441"/>
                        <StackPanel Margin="30 0 0 0" Width="150">
                            <TextBlock Text="COMPANY NAME"/>
                            <TextBlock Text="Age:">
                                    <Run Text="{Binding Age}"/>
                            </TextBlock>
                            <TextBlock Text="Money:">
                                    <Run Text="{Binding Money, StringFormat={}{0:C}}"/>
                            </TextBlock>
                            <TextBlock Text="Address:" TextWrapping="Wrap">
                                    <Run Text="{Binding Address}"/>
                            </TextBlock>
                        </StackPanel>
                    </StackPanel>
                </Grid>
            </Border>
            <DataTemplate.Triggers>
                <Trigger Property="IsMouseOver" Value="True">
                    <Setter Property="Background" Value="#7AAB7D" TargetName="border" />
                </Trigger>
            </DataTemplate.Triggers>
        </DataTemplate>
    </ItemsControl.ItemTemplate>
</ListBox>
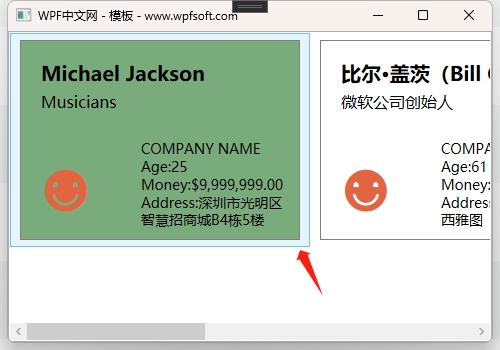
因为ListBox是ItemsControl的子类,所以,这样的修改是没有问题的。只不过,如上图所示,在每个元素的外围,当鼠标移上去时,会出现一个淡蓝色的边框区域,这是为何呢?
这是因为在ListBox的父类ItemsControl中定义了一个ItemContainerStyle的样式,这个样式决定了ListBox控件中每个元素的容器外观。原来,在集合控件中,并不是说将一堆元素直接丢到里面呈现,而是先给每个元素分配一个容器,再将它们呈现在集合控件中。就好比给每个学生发一套校服,穿好后再规规距距地坐在教室里。
既然如此,那我们就可以给每个学生重新发一套校服,或者干脆不穿校服——毕竟每个学生自己都穿了衣服的(数据模板)。
<ListBox.ItemContainerStyle>
    <Style TargetType="ListBoxItem">
        <Setter Property="Template">
            <Setter.Value>
                <ControlTemplate TargetType="ListBoxItem">
                    <ContentPresenter/>
                </ControlTemplate>
            </Setter.Value>
        </Setter>
    </Style>
</ListBox.ItemContainerStyle>
ItemContainerStyle的Template的内容必须是ControlTemplate (控件模板)。这里同样使用了ContentPresenter,我们已然在前面讲过,这里指的是,将来由每个元素进行替换。注意TargetType是ListBoxItem类型。因为这个校服的品牌方就是指ListBox的ListBoxItem元素。
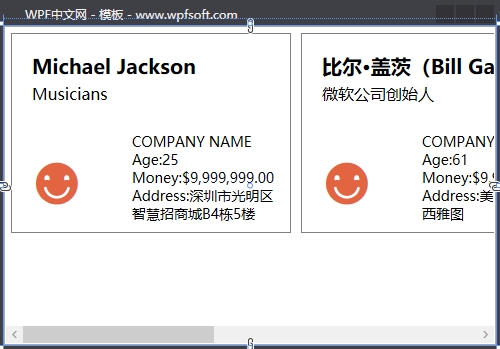
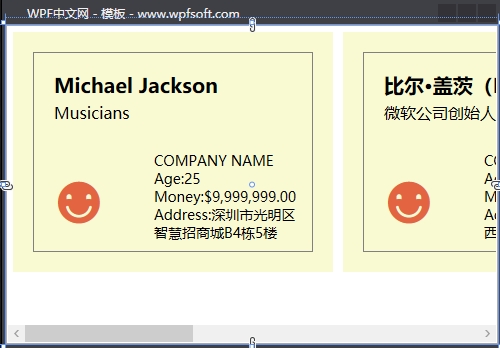
如果我们要给每个学生穿一件金黄色的衣服,如下所示
<ListBox.ItemContainerStyle>
    <Style TargetType="ListBoxItem">
        <Setter Property="Template">
            <Setter.Value>
                <ControlTemplate TargetType="ListBoxItem">
                    <Border Background="LightGoldenrodYellow"
                            Padding="15" Margin="5">
                        <ContentPresenter/>
                    </Border>
                </ControlTemplate>
            </Setter.Value>
        </Setter>
    </Style>
</ListBox.ItemContainerStyle>
当前课程源码下载:(注明:本站所有源代码请按标题搜索)
文件名:068-《ListBox的ItemContainerStyle》-源代码
链接:https://pan.baidu.com/s/1yu-q4tUtl0poLVgmcMfgBA
提取码:wpff
ListBox是一个列表控件,用于显示条目类的数据,默认每行只能显示一个内容项,当然,我们可以通过修改它的数据模板,来自定义每一行(元素)的数据外观,达到显示更多数据的目的。
一、ListBox的定义
public class ListBox : Selector
{
    public static readonly DependencyProperty SelectionModeProperty;
    public static readonly DependencyProperty SelectedItemsProperty;

    public ListBox();

    public IList SelectedItems { get; }
    public SelectionMode SelectionMode { get; set; }
    protected object AnchorItem { get; set; }
    protected internal override bool HandlesScrolling { get; }

    public void ScrollIntoView(object item);
    public void SelectAll();
    public void UnselectAll();
    protected override DependencyObject GetContainerForItemOverride();
    protected override bool IsItemItsOwnContainerOverride(object item);
    protected override AutomationPeer OnCreateAutomationPeer();
    protected override void OnIsMouseCapturedChanged(DependencyPropertyChangedEventArgs e);
    protected override void OnKeyDown(KeyEventArgs e);
    protected override void OnMouseMove(MouseEventArgs e);
    protected override void OnSelectionChanged(SelectionChangedEventArgs e);
    protected override void PrepareContainerForItemOverride(DependencyObject element, object item);
    protected bool SetSelectedItems(IEnumerable selectedItems);

}
二、属性分析
ListBox自身的属性比较少,SelectionMode 属性比较重要,它可以决定当前的ListBox控件是单选还是多选,它的值为Extended时,表示用户需要按下shift键才能多选。如果SelectionMode为多选状态,那么多选的结果保存在哪去了?
答案是SelectedItems 属性。
另外,ListBox还自带了滚动条,如果内容超出显示区域,这时滚动条便起作用。
我们在上一章节提过DisplayMemberPath、SelectedValuePath、SelectedItem和SelectedValue,那么,我们以一个实际的例子来说明这几个属性的用途。
三、ListBox示例
前端代码
<Window x:Class="HelloWorld.MainWindow"
        xmlns="http://schemas.microsoft.com/winfx/2006/xaml/presentation"
        xmlns:x="http://schemas.microsoft.com/winfx/2006/xaml"
        xmlns:d="http://schemas.microsoft.com/expression/blend/2008"
        xmlns:mc="http://schemas.openxmlformats.org/markup-compatibility/2006"
        xmlns:local="clr-namespace:HelloWorld"
        xmlns:forms="clr-namespace:System.Windows.Forms;assembly=System.Windows.Forms"
        mc:Ignorable="d" FontSize="14"
        Title="WPF中文网之控件课程 - www.wpfsoft.com" Height="350" Width="500">
    <StackPanel>
        <ListBox x:Name="listbox" MinHeight="100"
                 DisplayMemberPath="Name"
                 SelectedValuePath="Age"/>
        <Button Content="查看结果" Click="Button_Click"/>
        <TextBlock x:Name="_TextBlock"/>
    </StackPanel>
</Window>
后端代码
using System;
using System.Windows;
using System.Windows.Controls;
using System.Windows.Threading;

namespace HelloWorld
{
    public class Person
    {
        public string Name { get; set; }
        public int Age { get; set; }
        public string Address { get; set; }

    }

    /// <summary>
    /// MainWindow.xaml 的交互逻辑
    /// </summary>
    public partial class MainWindow : Window
    {
        public MainWindow()
        {
            InitializeComponent();

            listbox.Items.Add(new Person { Name = "张三", Age = 22, Address = "广东省廉江市车板镇大坝村" });
            listbox.Items.Add(new Person { Name = "李四", Age = 23, Address = "江西省景德镇市市辖区" });
            listbox.Items.Add(new Person { Name = "王五", Age = 24, Address = "上海市虹口区" });
        }

        private void Button_Click(object sender, RoutedEventArgs e)
        {
            var selectedItem = listbox.SelectedItem;
            var selectedValue = listbox.SelectedValue;
            _TextBlock.Text = $"{selectedItem},{selectedValue}";
        }
    }
}
代码分析
在前端代码中,我们设置了DisplayMemberPath属性值为“Name”,而SelectedValuePath属性值为“Age",这两个值实际上是Person类的两个属性,F5启动调试后,我们可以在界面上看到张三、李四和王五的名字,但是看不到他们的年龄和地址,这是因为ListBox默认每行只能显示一个内容项,而且这里我们设置了DisplayMemberPath属性,只能显示名字。
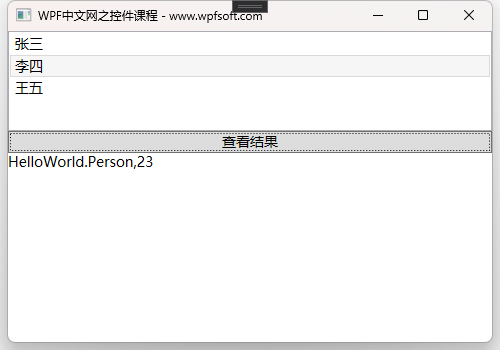
我们选中ListBox中的李四,然后单点查看结果按钮,SelectedItem属性得到了一个Person类,所以输出的值为HelloWorld.Person,而SelectedValue属性得到了李四的年龄,所以输出的结果是23。
重庆教主说
如果把SelectionMode属性设为多选Multiple或Extended,试试看,会发生什么效果呢?
Items属性是一个只读属性,所以我们只能能过Items的Add方法向集合增加元素。
四、ListBoxItem子项
其实,ListBox还有它专门配合业务开发的子项控件——ListBoxItem。ListBoxItem继承于ContentControl内容控件,仔细想,这意味着什么?还记得我们在分享ContentControl提过”它有一个叫Content属性“一嘴吗?Content属性可以容纳任意引用类型,也就是说,ListBoxItem也可以容纳任意引用类型,也就是说,ListBox的子项也可以容纳任意的引用类型。
这么一说,感觉ListBoxr还蛮强大的呢!
所以,ListBoxItem可以这样使用
<Window x:Class="HelloWorld.MainWindow"
        xmlns="http://schemas.microsoft.com/winfx/2006/xaml/presentation"
        xmlns:x="http://schemas.microsoft.com/winfx/2006/xaml"
        xmlns:d="http://schemas.microsoft.com/expression/blend/2008"
        xmlns:mc="http://schemas.openxmlformats.org/markup-compatibility/2006"
        xmlns:local="clr-namespace:HelloWorld"
        xmlns:forms="clr-namespace:System.Windows.Forms;assembly=System.Windows.Forms"
        mc:Ignorable="d" FontSize="14"
        Title="WPF中文网之控件课程 - www.wpfsoft.com" Height="350" Width="500">
    <StackPanel>
        <ListBox x:Name="listbox">
            <ListBoxItem>
                <Button Content="这是一个按钮"/>
            </ListBoxItem>
            <ListBoxItem>
                <Border Height="30" Background="Red"/>
            </ListBoxItem>
            <ListBoxItem Content="这是一个字符串"/>
            <ListBoxItem>
                <ProgressBar Maximum="100" Value="50" Height="25" Width="450"/>
            </ListBoxItem>
            这里直接写字符串
            <ListBoxItem>
                <StackPanel Orientation="Horizontal">
                    <CheckBox Content="复选框"/>
                    <RadioButton Content="单选框 "/>
                </StackPanel>
            </ListBoxItem>
        </ListBox>
        <Button Content="查看结果" Click="Button_Click"/>
        <TextBlock x:Name="textblock" TextWrapping="Wrap"/>
    </StackPanel>
</Window>
后台代码
public partial class MainWindow : Window
    {
        public MainWindow()
        {
            InitializeComponent();
        }

        private void Button_Click(object sender, RoutedEventArgs e)
        {
            try
            {
                var selectedItem = listbox.SelectedItem;
                var content = ((ContentControl)selectedItem).Content;
                textblock.Text = $"selectedItem={selectedItem}\r\ncontent={content}";
            }
            catch (Exception ex)
            {
                MessageBox.Show(ex.Message);
            }
        }
    }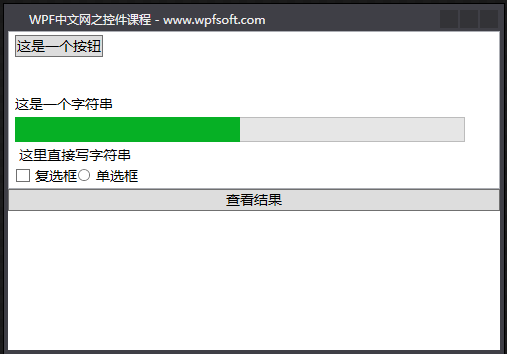
如上所示,我们在ListBoxj控件里面实例化了好几个ListBoxItem,但是每个ListBoxItem的Content属性都不一样,有Button,Border ,ProgressBar ,字符串,最后,我们来获取这些选中项的内容。
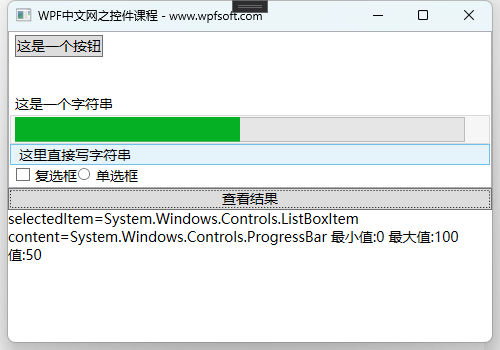
除了直接写的字符串不能转换之外,其它项的结果,SelectedItem属性总是ListBoxItem,而Content可以是我们设置的其它控制。
要全面了解ListBoxItem,不能不看看它的定义。
public class ListBoxItem : ContentControl
{
    public static readonly DependencyProperty IsSelectedProperty;
    public static readonly RoutedEvent SelectedEvent;
    public static readonly RoutedEvent UnselectedEvent;

    public ListBoxItem();

    public bool IsSelected { get; set; }

    public event RoutedEventHandler Selected;
    public event RoutedEventHandler Unselected;

    protected override AutomationPeer OnCreateAutomationPeer();
    protected override void OnMouseEnter(MouseEventArgs e);
    protected override void OnMouseLeave(MouseEventArgs e);
    protected override void OnMouseLeftButtonDown(MouseButtonEventArgs e);
    protected override void OnMouseRightButtonDown(MouseButtonEventArgs e);
    protected virtual void OnSelected(RoutedEventArgs e);
    protected virtual void OnUnselected(RoutedEventArgs e);
    protected internal override void OnVisualParentChanged(DependencyObject oldParent);

}
如上所示,可以看到ListBoxItem有一个叫IsSelected属性,表示该项是否被选中,同时,它还有两个事件,分别是Selected选中和Unselected未选中,我们可以去订阅这两个事件,以此来做一些业务。
关于ListBox以及ListBoxItem,我们就先介绍这么多,实际上它的用法远不止这些,如果加上模板、样式、数据绑定、触发器,它还可以实现许多意想不到的效果。关于这部分的内容,请参阅模板样式章节关于ListBox控件的用法。
所以,ListBox列表控件默认情况下,只能显示一个数据项,那如果我想把Person类的Name、Age、Address三个属性值都显示出来呢?有办法——ListView控件可以做到。
当前课程源码下载:(注明:本站所有源代码请按标题搜索)
文件名:039-《ListBox列表控件》-源代码-1,039-《ListBox列表控件》-源代码-2
链接:https://pan.baidu.com/s/1yu-q4tUtl0poLVgmcMfgBA
提取码:wpff
——重庆教主 2023年9月1日
 WPF中文网