 WPF中文网
一、什么是Effect
Effect是WPF特效抽象基类,不可实例化。它的下面有几个子类,分别是DropShadowEffect、BlurEffect和ShaderEffect(抽象子类)。
public abstract class Effect : Animatable, IResource
{
    protected Effect();
    public static Brush ImplicitInput { get; }
    protected internal virtual GeneralTransform EffectMapping { get; }
    public Effect Clone();
    public Effect CloneCurrentValue();

}
从上面的定义得知,Effect 的基类是Animatable,而Animatable是提供动画支持的基类。下面我们介绍一下DropShadowEffect子类。
二、DropShadowEffect阴影特效
DropShadowEffect用于给控件添加阴影效果。。它的定义如下所示:
public sealed class DropShadowEffect : Effect
{
    public static readonly DependencyProperty ShadowDepthProperty;
    public static readonly DependencyProperty ColorProperty;
    public static readonly DependencyProperty DirectionProperty;
    public static readonly DependencyProperty OpacityProperty;
    public static readonly DependencyProperty BlurRadiusProperty;
    public static readonly DependencyProperty RenderingBiasProperty;

    public DropShadowEffect();

    public double ShadowDepth { get; set; }
    public Color Color { get; set; }
    public double Direction { get; set; }
    public double Opacity { get; set; }
    public double BlurRadius { get; set; }
    public RenderingBias RenderingBias { get; set; }

    public DropShadowEffect Clone();
    public DropShadowEffect CloneCurrentValue();
    protected override Freezable CreateInstanceCore();
}
下面是它的常用属性说明表
| 属性名 | 功能说明 | 例子 |
| Color | 设置阴影效果背景色 | Color="Red" |
| ShadowDepth | 设置阴影的偏移度 | ShadowDepth="5" |
| Direction | 设置阴影的角度 | Direction="-45" |
| BlurRadius | 设置阴影模糊程度 | BlurRadius="20" |
| Opacity | 设置阴影透明度 | Opacity="1" |
例如,我们给一个按钮设置阴影效果。
<Button Content="进入WPF中文网" Width="100" Height="50">
    <Button.Effect>
        <DropShadowEffect ShadowDepth="10" BlurRadius="20" Color="Gray"/>
    </Button.Effect>
</Button>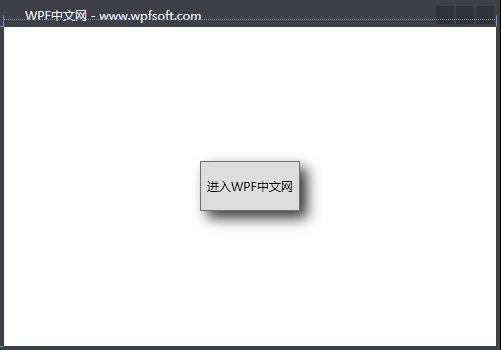
<Window x:Class="HelloWorld.MainWindow"
        xmlns="http://schemas.microsoft.com/winfx/2006/xaml/presentation"
        xmlns:x="http://schemas.microsoft.com/winfx/2006/xaml"
        xmlns:d="http://schemas.microsoft.com/expression/blend/2008"
        xmlns:mc="http://schemas.openxmlformats.org/markup-compatibility/2006"
        xmlns:local="clr-namespace:HelloWorld"
        xmlns:controls="clr-namespace:HelloWorld.Controls"
        xmlns:helper="clr-namespace:HelloWorld.MVVM"
        mc:Ignorable="d"
        Title="WPF中文网 - www.wpfsoft.com" Height="350" Width="500">
    <Window.DataContext>
        <local:MainViewModel/>
    </Window.DataContext>
    <Grid x:Name="grid" Background="Transparent"
          MouseMove="grid_MouseMove">
        <Button x:Name="button" Content="进入WPF中文网" Width="100" Height="50">
            <Button.Effect>
                <DropShadowEffect Direction="-45"
                                  ShadowDepth="10"
                                  BlurRadius="25"
                                  Color="Gray"/>
            </Button.Effect>
        </Button>
    </Grid>
</Window>
然后在Grid控件的鼠标移动事件中执行以下计算:
private void grid_MouseMove(object sender, MouseEventArgs e)
{
    double width = grid.ActualWidth;
    double height = grid.ActualHeight;
    Point centerPoint = new Point(width / 2, height / 2);
    Point mousePoint = e.GetPosition(grid);

    //与X轴的夹角
    double angle = Math.Atan2(
        mousePoint.Y - centerPoint.Y,
        mousePoint.X - centerPoint.X); //弧度
    double theta = angle * 180 / Math.PI;// 角度
    this.Title = $"角度={theta}";

    DropShadowEffect dropShadowEffect = button.Effect as DropShadowEffect;

    //计算距离
    var distance = Math.Sqrt(
        (Math.Pow(mousePoint.X - centerPoint.X, 2)
        + Math.Pow(mousePoint.Y - centerPoint.Y, 2)));

    dropShadowEffect.Direction = -theta;//设置阴影角度
    dropShadowEffect.ShadowDepth = distance/10;//设置阴影偏移量
    dropShadowEffect.BlurRadius = distance / 10 * 2;//设置模糊程度
}
通过这个例子,我们可以直观的感受DropShadowEffect 几个属性值变化所带来的效果。当鼠标在窗体内进行上下左右移动时,按钮的阴影的角度、偏移值和模糊程度都会随之而变化。
当前课程源码下载:(注明:本站所有源代码请按标题搜索)
文件名:098-《DropShadowEffect阴影特效》-源代码
链接:https://pan.baidu.com/s/1yu-q4tUtl0poLVgmcMfgBA
提取码:wpff
——重庆教主 2023年11月9日
BlurEffect是直接作用于控件元素进行模糊的类型。
public sealed class BlurEffect : Effect
{
    public static readonly DependencyProperty RadiusProperty;
    public static readonly DependencyProperty KernelTypeProperty;
    public static readonly DependencyProperty RenderingBiasProperty;

    public BlurEffect();

    public double Radius { get; set; }
    public KernelType KernelType { get; set; }
    public RenderingBias RenderingBias { get; set; }

    public BlurEffect Clone();
    public BlurEffect CloneCurrentValue();
    protected override Freezable CreateInstanceCore();

}
下面是它的属性说明表
| 属性名称 | 说明 | 例子 |
| Radius | 获取或设置模糊效果的曲线的半径。默认值为5 | Radius="5" |
| KernelType | 获取或设置计算变得模糊的曲线 | |
| RenderingBias | 获取或设置是否呈现效果时注重速度还是质量 |
KernelType是一个枚举类型,值为Gaussian时表示为模糊创建平滑分布的分布曲线。,值为Box表示用平直分布曲线创建的简单模糊。
下面的例子通过获取当前鼠标的坐标位置与Ellipse椭圆中心坐标的距离,动态设置椭圆控件的模糊程度。
<Grid x:Name="grid" Background="Transparent"
      MouseMove="grid_MouseMove">
    <Ellipse x:Name="ellipse"
             Width="200"
             Height="200">
        <Ellipse.Effect>
            <BlurEffect Radius="0" KernelType="Box"/>
        </Ellipse.Effect>
        <Ellipse.Fill>
            <RadialGradientBrush GradientOrigin="0.25,0.25"
                                 RadiusX="0.75"
                                 RadiusY="0.75">
                <RadialGradientBrush.GradientStops>
                    <GradientStop Color="White" Offset="0" />
                    <GradientStop Color="Goldenrod" Offset="0.65" />
                    <GradientStop Color="Gray" Offset="0.8" />
                </RadialGradientBrush.GradientStops>
            </RadialGradientBrush>
        </Ellipse.Fill>
    </Ellipse>
</Grid>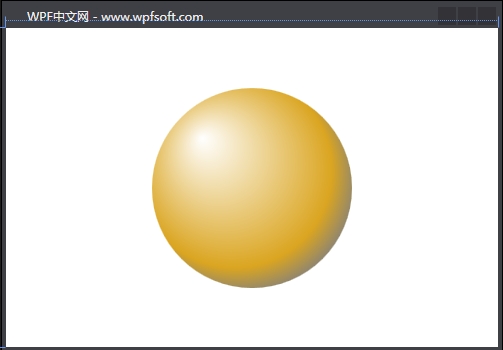
后端代码:
private void grid_MouseMove(object sender, MouseEventArgs e)
{
    double width = grid.ActualWidth;
    double height = grid.ActualHeight;
    Point centerPoint = new Point(width / 2, height / 2);
    Point mousePoint = e.GetPosition(grid);

    BlurEffect effect = ellipse.Effect as BlurEffect;

    //计算距离
    var distance = Math.Sqrt(
        (Math.Pow(mousePoint.X - centerPoint.X, 2)
        + Math.Pow(mousePoint.Y - centerPoint.Y, 2)));

    effect.Radius = distance / 5;//设置模糊

    this.Title = $"距离={distance}";
}
当前课程源码下载:(注明:本站所有源代码请按标题搜索)
文件名:099-《BlurEffect模糊特效》-源代码
链接:https://pan.baidu.com/s/1yu-q4tUtl0poLVgmcMfgBA
提取码:wpff
——重庆教主 2023年11月9日