 WPF中文网
通过前面的学习,我们会发现,只要是在XAML代码中定义和执行动画,都需要用到Trigger中的事件触发器去启动一个动画。除了控件(FrameworkElement基类)拥有Triggers属性,Style样式也拥有Triggers属性,这也就意味着,我们可以在定义某个控件的Style样式时,再定义一些动画交互。
下面,我们为Rectangle矩形控件定义一个样式,在样式中再利用事件触发器去定义和执行一些动画。
<Window.Resources>
    <Style x:Key="RectangleStyle" TargetType="Rectangle">
        <Setter Property="Width" Value="50"/>
        <Setter Property="Height" Value="50"/>
        <Setter Property="Margin" Value="10,5"/>
        <Setter Property="StrokeThickness" Value="1"/>
        <Setter Property="Stroke" Value="DarkCyan"/>
        <Setter Property="HorizontalAlignment" Value="Left"/>
        <Style.Triggers>
            <EventTrigger RoutedEvent="Loaded">
                <BeginStoryboard>
                    <Storyboard>
                        <DoubleAnimation Duration="0:0:0.5"
                                         To="450"
                                         Storyboard.TargetProperty="Width"/>
                    </Storyboard>
                </BeginStoryboard>
            </EventTrigger>
            <EventTrigger RoutedEvent="MouseEnter">
                <BeginStoryboard>
                    <Storyboard>
                        <DoubleAnimation Duration="0:0:0.5"
                                         To="350"
                                         Storyboard.TargetProperty="Width"/>
                    </Storyboard>
                </BeginStoryboard>
            </EventTrigger>
            <EventTrigger RoutedEvent="MouseLeave">
                <BeginStoryboard>
                    <Storyboard>
                        <DoubleAnimation Duration="0:0:0.5"
                                         To="50"
                                         Storyboard.TargetProperty="Width"/>
                    </Storyboard>
                </BeginStoryboard>
            </EventTrigger>
        </Style.Triggers>
    </Style>
</Window.Resources>
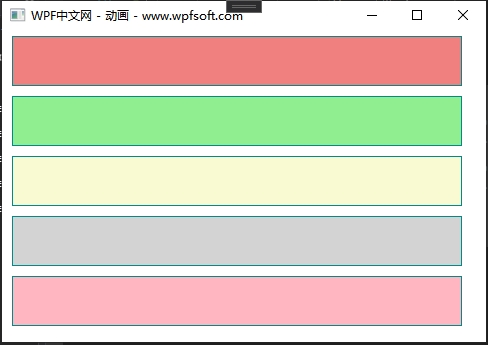
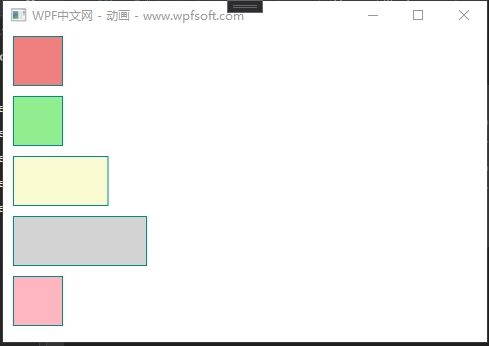
我们在Style样式的Triggers属性中定义了3个事件触发器,而每个事件触发器都拥有各自在的故事板,在故事板中定义了一个DoubleAnimation 动画,并将动画的输出值作用到Rectangle矩形的宽度。
于是,我们就可以在前端XAML中去实例化一些矩形并引用该样式。
<StackPanel>
    <Rectangle Fill="LightCoral" Style="{StaticResource RectangleStyle}"/>
    <Rectangle Fill="LightGreen" Style="{StaticResource RectangleStyle}"/>
    <Rectangle Fill="LightGoldenrodYellow" Style="{StaticResource RectangleStyle}"/>
    <Rectangle Fill="LightGray" Style="{StaticResource RectangleStyle}"/>
    <Rectangle Fill="LightPink" Style="{StaticResource RectangleStyle}"/>
</StackPanel>
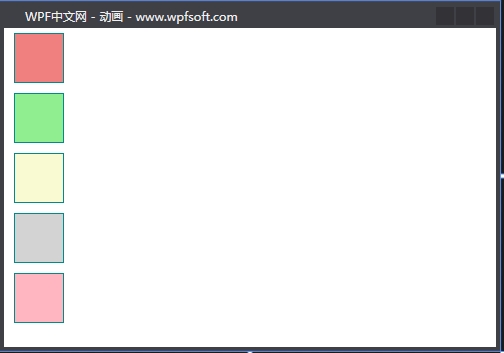
矩形的默认长度为50像素,当启动之后,会执行Loaded事件触发器,以动画的方式将矩形的宽度改为450。
一旦鼠标移到某个矩形上,将执行MouseEnter事件触发器动画,将矩形的宽度以动画的方式改为350像素。当鼠标离开这个矩形时,将执行MouseLeave事件触发器动画,将矩形的宽度改为50像素。
当前课程源码下载:(注明:本站所有源代码请按标题搜索)
文件名:105-《在Style样式中使用动画》-源代码
链接:https://pan.baidu.com/s/1yu-q4tUtl0poLVgmcMfgBA
提取码:wpff
——重庆教主 2023年11月17日
AnimationTimeline抽象基类下面有3种动画,分别是普通动画、关键帧动画和路径动画。像前面学过的DoubleAnimation就是普通动画,DoubleAnimationUsingKeyFrames就是关键帧动画,那么路径动画是什么?DoubleAnimationUsingPath就是一个路径动画。也就是说,<Type>+AnimationUsingPath这种命令格式的动画,就是路径动画。
路径动画是一种使用 PathGeometry(路径几何)作为输入的动画,我们曾经在介绍《Path路径》时讲过PathGeometry,要灵活使用路径动画,则必须要掌握PathGeometry基础知识。
WPF提供了3种路径动画,如下表所示
| 路径动画名称 | 输入值类型 | 说明 |
| DoubleAnimationUsingPath | Double | 沿着路径针对对象进行动画处理(双重动画) |
| PointAnimationUsingPath | Point | 沿着路径针对对象进行动画处理(点动画) |
| MatrixAnimationUsingPath | Matrix | 沿着路径针对对象进行动画处理(矩阵动画) |
我们以DoubleAnimationUsingPath为例,来说明路径动画的用法。
public class DoubleAnimationUsingPath : DoubleAnimationBase
{
    public static readonly DependencyProperty PathGeometryProperty;
    public static readonly DependencyProperty SourceProperty;

    public DoubleAnimationUsingPath();

    public PathGeometry PathGeometry { get; set; }
    public PathAnimationSource Source { get; set; }
    public bool IsAdditive { get; set; }
    public bool IsCumulative { get; set; }

    public DoubleAnimationUsingPath Clone();
    protected override Freezable CreateInstanceCore();
    protected override double GetCurrentValueCore(double defaultOriginValue, double defaultDestinationValue, AnimationClock animationClock);
    protected override void OnChanged();

}
可以看到DoubleAnimationUsingPath有一个PathGeometry(路径几何)属性,用来设置路径内容。Source 属性会根据路径的方位输出一个动画值,它的类型为PathAnimationSource枚举,其中有3个值,分别如下:
| PathAnimationSource.X | 指定沿动画序列路径前进过程中的 x 坐标偏移量。 |
| PathAnimationSource.Y | 指定沿动画序列路径前进过程中的 y 坐标偏移量。 |
| PathAnimationSource.Angle | 指定沿动画序列路径前进过程中的旋转正切角。 |
最后,把这个Source值使用到目标对象(可能是某个控件)的属性即可。
在XAML代码中使用DoubleAnimationUsingPath时,依然要先实例化一个Storyboard故事板,DoubleAnimationUsingPath实例将放到Storyboard故事板的Children属性中。对了,Storyboard故事板本身并没有Children属性,而是继承了它的TimelineGroup基类。
例如:
<Window.Resources>
    <Storyboard x:Key="PathStoryboard" RepeatBehavior = "Forever" AutoReverse="True">
        <DoubleAnimationUsingPath BeginTime="00:00:00" Duration="00:00:05"
                                  Storyboard.TargetName="EllipseTranslateTransform"
                                  Storyboard.TargetProperty="X"
                                  Source="X">
            <DoubleAnimationUsingPath.PathGeometry>
                <PathGeometry >
                    <PathGeometry.Figures>
                        <PathFigure IsFilled="False" StartPoint="5,5">
                            <BezierSegment Point1="200,50" Point2="50,200"  Point3="350,250"/>
                        </PathFigure>
                    </PathGeometry.Figures>
                </PathGeometry>
            </DoubleAnimationUsingPath.PathGeometry>
        </DoubleAnimationUsingPath>
        <DoubleAnimationUsingPath BeginTime="00:00:00" Duration="00:00:05"
                                  Storyboard.TargetName="EllipseTranslateTransform"
                                  Storyboard.TargetProperty="Y"
                                  Source="Y">
            <DoubleAnimationUsingPath.PathGeometry>
                <PathGeometry >
                    <PathGeometry.Figures>
                        <PathFigure IsFilled="False" StartPoint="5,5">
                            <BezierSegment Point1="200,50" Point2="50,200"  Point3="350,250"/>
                        </PathFigure>
                    </PathGeometry.Figures>
                </PathGeometry>
            </DoubleAnimationUsingPath.PathGeometry>
        </DoubleAnimationUsingPath>
    </Storyboard>
</Window.Resources>
我们在PathStoryboard实例中定义了两个DoubleAnimationUsingPath,两个DoubleAnimationUsingPath的PathGeometry 内容都相同,一个赋值给X属性,一个赋值给Y属性。什么意思?将路径动画的X输出值赋值到椭圆的TranslateTransform的X属性,将路径动画的Y输出值赋值到椭圆的TranslateTransform的Y属性,从而控制椭圆的平移路径。关于椭圆的定义如下:
<Canvas x:Name="canvas" MouseUp="canvas_MouseUp">
    <Canvas.Triggers>
        <EventTrigger RoutedEvent="Loaded">
            <BeginStoryboard Storyboard="{StaticResource PathStoryboard}"/>
        </EventTrigger>
    </Canvas.Triggers>
    <Canvas.Background>
        <LinearGradientBrush StartPoint="0.1,0.5" EndPoint="0.8,0.1" >
            <LinearGradientBrush.GradientStops>
                <GradientStop Color="LightBlue"  Offset="0" />
                <GradientStop Color="LightGoldenrodYellow"  Offset="0.5" />
                <GradientStop Color="LightPink" Offset="1" />
            </LinearGradientBrush.GradientStops>
        </LinearGradientBrush>
    </Canvas.Background>

    <Ellipse x:Name="ellipse"
         Width="100"
         Height="100" Canvas.Left="0" Canvas.Top="0">
        <Ellipse.RenderTransform>
            <TranslateTransform x:Name="EllipseTranslateTransform"/>
        </Ellipse.RenderTransform>
        <Ellipse.Fill>
            <RadialGradientBrush GradientOrigin="0.25,0.25"
                             RadiusX="0.75"
                             RadiusY="0.75">
                <RadialGradientBrush.GradientStops>
                    <GradientStop Color="White" Offset="0" />
                    <GradientStop Color="Goldenrod" Offset="0.65" />
                    <GradientStop Color="Gray" Offset="0.8" />
                </RadialGradientBrush.GradientStops>
            </RadialGradientBrush>
        </Ellipse.Fill>
    </Ellipse>
    <Path Stroke="Black" Fill="LightPink" StrokeThickness="5">
        <Path.Data>
            <PathGeometry>
                <PathGeometry.Figures>
                    <PathFigure IsFilled="False" StartPoint="5,5">
                        <BezierSegment Point1="200,50" Point2="50,200"  Point3="350,250"/>
                    </PathFigure>
                </PathGeometry.Figures>
            </PathGeometry>
        </Path.Data>
    </Path>
</Canvas>
如何启动这个路径动画?我们在Canvas的Loaded事件中通过触发器启动这个动画。
当前课程源码下载:(注明:本站所有源代码请按标题搜索)
文件名:104-《什么是路径动画》-源代码
链接:https://pan.baidu.com/s/1yu-q4tUtl0poLVgmcMfgBA
提取码:wpff
——重庆教主 2023年11月16日
我们在前面的章节中讲过如何在C#代码中使用Animation动画,本节将讲解在C#代码中使用关键帧动画。其实两者的用法几乎是一模一样的,只是关键帧动画的实例化时,设置的参数不同而已。
首先我们在XAML前端代码中实现如下的效果。
<Canvas x:Name="canvas" MouseUp="canvas_MouseUp">
    <Canvas.Background>
        <LinearGradientBrush StartPoint="0.1,0.5" EndPoint="0.8,0.1" >
            <LinearGradientBrush.GradientStops>
                <GradientStop Color="LightBlue"  Offset="0" />
                <GradientStop Color="LightGoldenrodYellow"  Offset="0.5" />
                <GradientStop Color="LightPink" Offset="1" />
            </LinearGradientBrush.GradientStops>
        </LinearGradientBrush>
    </Canvas.Background>
</Canvas>
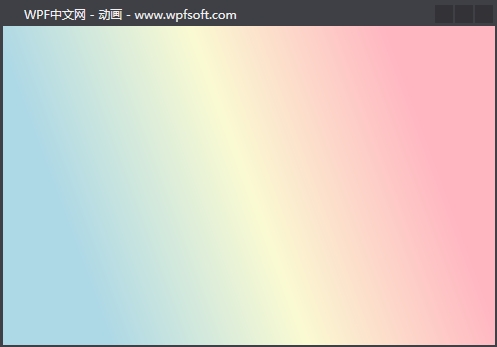
我们将Canvas控件背景设置成LinearGradientBrush 线性渐变,模拟云上晚霞的天空。
接下来,我们每次单击Canvas控件时就改变线性渐变的开始位置和结束位置,并且使用关键帧动画去做改变,这会产生一种穿行云间的感觉。
private void canvas_MouseUp(object sender, MouseButtonEventArgs e)
{
    //实例化关键帧动画和关键帧对象
    LinearGradientBrush brush = canvas.Background as LinearGradientBrush;
    PointAnimationUsingKeyFrames startAnimation = new PointAnimationUsingKeyFrames();
    PointAnimationUsingKeyFrames endAnimation = new PointAnimationUsingKeyFrames();
    LinearPointKeyFrame startKey = new LinearPointKeyFrame();
    LinearPointKeyFrame endKey = new LinearPointKeyFrame();
    startAnimation.KeyFrames.Add(startKey);
    endAnimation.KeyFrames.Add(endKey);

    //随机xy的值,并设置关键帧对象的Value和KeyTime
    Random random = new Random();
    double x = random.NextDouble();
    Thread.Sleep(1);
    double y = random.NextDouble();
    startKey.Value = new Point(x, y);
    startKey.KeyTime = TimeSpan.FromMilliseconds(2500);

    Thread.Sleep(1);
    x = random.NextDouble();
    Thread.Sleep(1);
    y = random.NextDouble();
    endKey.Value = new Point(x, y);
    endKey.KeyTime = TimeSpan.FromMilliseconds(1500);

    //开启动画
    brush.BeginAnimation(LinearGradientBrush.StartPointProperty, startAnimation);
    brush.BeginAnimation(LinearGradientBrush.EndPointProperty, endAnimation);

}
在上述代码中,首先我们实例化了两个关键帧动画,名叫startAnimation 和endAnimation ,然后,分别为这两个关键帧动画增加了一个关键帧对象(注:可以增加多个关键帧对象),然后随机两个Point对象赋值给关键帧对象的Value,设置好各自的KeyTime,最后是启用动画。
最后的效果如下:
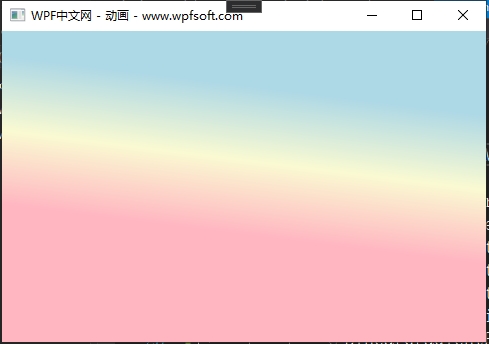
随着每次鼠标的单击,Canvas的背景将随机产生渐变效果。
当前课程源码下载:(注明:本站所有源代码请按标题搜索)
文件名:103-《在C#代码中使用关键帧动画》-源代码
链接:https://pan.baidu.com/s/1yu-q4tUtl0poLVgmcMfgBA
提取码:wpff
——重庆教主 2023年11月15日
在DoubleAnimationBase抽象基类下面继承了3个子类,分别是DoubleAnimation、DoubleAnimationUsingKeyFrames和DoubleAnimationUsingPath,其中DoubleAnimationUsingKeyFrames被称为关键帧动画,DoubleAnimationUsingPath被称为路径动画,而DoubleAnimation动画我们已经在上一节学过,这里就不在赘述。在本节课程,我们以DoubleAnimationUsingKeyFrames关键帧动画为例,讲解什么是关键帧动画,以及怎么使用它。
一、什么是关键帧动画
在WPF中所有以KeyFrames结尾的动画都叫关键帧动画。它其实与上一节的动画类似,也是对某个目标属性进行动画处理。DoubleAnimation拥有Form/To,表示从一个值过渡到另一个值。而关键帧动画使用关键帧对象进行描述,而且一个关键帧动画可以拥有多个关键帧对象。
什么是关键帧对象?其实就是一个KeyFrames属性集合中的元素。所以我们需要看一下DoubleAnimationUsingKeyFrames的定义。
二、DoubleAnimationUsingKeyFrames的定义
public class DoubleAnimationUsingKeyFrames : DoubleAnimationBase, IKeyFrameAnimation, IAddChild
{
    public DoubleAnimationUsingKeyFrames();

    public DoubleKeyFrameCollection KeyFrames { get; set; }
    public bool IsAdditive { get; set; }
    public bool IsCumulative { get; set; }

    public DoubleAnimationUsingKeyFrames Clone();
    public DoubleAnimationUsingKeyFrames CloneCurrentValue();
    public bool ShouldSerializeKeyFrames();
    protected virtual void AddChild(object child);
    protected virtual void AddText(string childText);
    protected override void CloneCore(Freezable sourceFreezable);
    protected override void CloneCurrentValueCore(Freezable sourceFreezable);
    protected override Freezable CreateInstanceCore();
    protected override bool FreezeCore(bool isChecking);
    protected override void GetAsFrozenCore(Freezable source);
    protected override void GetCurrentValueAsFrozenCore(Freezable source);
    protected sealed override double GetCurrentValueCore(double defaultOriginValue, double defaultDestinationValue, AnimationClock animationClock);
    protected sealed override Duration GetNaturalDurationCore(Clock clock);
    protected override void OnChanged();

}
在上面的代码中,KeyFrames属性表示DoubleAnimationUsingKeyFrames的关键帧对象集合,这个集合中的元素类型为DoubleKeyFrame,但是DoubleKeyFrame其实是一个抽象类哦,所以真正在使用这个集合时,其中的元素都是DoubleKeyFrame的子类,比如LinearDoubleKeyFrame(线性内插关键帧)。
DoubleKeyFrame有哪些子类?
//离散:两个关键帧之间突变(到达时间点的时候硬切换,没有过渡效果)
System.Windows.Media.Animation.DiscreteDoubleKeyFrame

//缓动:使用缓动函数曲线实现弹性变化
System.Windows.Media.Animation.EasingDoubleKeyFrame

//线性:两个关键帧之间均匀变化
System.Windows.Media.Animation.LinearDoubleKeyFrame

//样条:使用贝塞尔曲线实现更精确的加速和减速控制
System.Windows.Media.Animation.SplineDoubleKeyFrame
结论:一个关键帧对象表示一个动画片段,而一个关键帧动画包含多个关键帧对象。所以,我们可以利用关键帧动画设计出更复杂的动画效果。下面我们以一个实例来说明关键帧的用法。
三、关键帧动画实例
这次我们在XAML前端代码中演示关键帧动画的用法。首先在窗体资源中定义一个故事板。
<Storyboard x:Key="KeyFrameStoryboard">
    <PointAnimationUsingKeyFrames
        Storyboard.TargetName="ellipse"
        Storyboard.TargetProperty="Fill.GradientOrigin"
        AutoReverse="True"
        RepeatBehavior="Forever">
        <LinearPointKeyFrame Value="0.25,0.25" KeyTime="0:0:0"/>
        <LinearPointKeyFrame Value="0.75,0.35" KeyTime="0:0:1"/>
        <LinearPointKeyFrame Value="0.25,0.75" KeyTime="0:0:2"/>
        <LinearPointKeyFrame Value="0.85,0.85" KeyTime="0:0:3"/>
    </PointAnimationUsingKeyFrames>
</Storyboard>
这个Storyboard 中,我们实例化了一个PointAnimationUsingKeyFrames ,也就是点关键帧动画。这里有3个地方需要注意,第一点,Storyboard.TargetName指向了目标对象;第二点,Storyboard.TargetProperty指向了目标对象的属性;第三点,我们在PointAnimationUsingKeyFrames 的KeyFrames 属性中实例化了4个LinearPointKeyFrame 关键帧对象,这4个对象的Value值首尾相接实现动画处理,而后面的KeyTime,表示时间段上的连续。从这个Value的变化,我们可以得出结论,关键帧可以提供多个动画值输出给目标对象的属性,而一般的动画只有单一个值的变化。
怎么使用这个故事板?
<Ellipse x:Name="ellipse"
         Canvas.Left="-200"
         Canvas.Top="50"
         Width="200"
         Height="200">
    <Ellipse.Triggers>
        <EventTrigger RoutedEvent="Loaded">
            <BeginStoryboard Storyboard="{StaticResource KeyFrameStoryboard}"/>
        </EventTrigger>
    </Ellipse.Triggers>
    <Ellipse.Fill>
        <RadialGradientBrush GradientOrigin="0.25,0.25"
                             RadiusX="0.75"
                             RadiusY="0.75">
            <RadialGradientBrush.GradientStops>
                <GradientStop Color="White" Offset="0" />
                <GradientStop Color="LightCoral" Offset="0.65" />
                <GradientStop Color="Gray" Offset="0.8" />
            </RadialGradientBrush.GradientStops>
        </RadialGradientBrush>
    </Ellipse.Fill>
</Ellipse>
我们在椭圆的的Loaded事件中,利用事件触发器EventTrigger去触发这个KeyFrameStoryboard。于是,椭圆的画刷的GradientOrigin属性便被这个动画一直修改。椭圆中间的白点将随着动画输出的坐标点而运动。
下面是直接在Canvas的触发器中定义并使用关键帧动画的XAML代码。
<Canvas.Triggers>
    <EventTrigger RoutedEvent="Canvas.Loaded">
        <BeginStoryboard>
            <Storyboard>
                <DoubleAnimationUsingKeyFrames
                    Storyboard.TargetName="ellipse"
                    Storyboard.TargetProperty="(Canvas.Left)">
                    <LinearDoubleKeyFrame Value="0" KeyTime="0:0:0.5"/>
                    <EasingDoubleKeyFrame Value="150" KeyTime="0:0:2">
                        <EasingDoubleKeyFrame.EasingFunction>
                            <SineEase EasingMode="EaseInOut"/>
                        </EasingDoubleKeyFrame.EasingFunction>
                    </EasingDoubleKeyFrame>
                </DoubleAnimationUsingKeyFrames>
            </Storyboard>
        </BeginStoryboard>
    </EventTrigger>
    <EventTrigger RoutedEvent="Canvas.MouseLeftButtonUp">
        <BeginStoryboard>
            <Storyboard>
                <DoubleAnimationUsingKeyFrames Storyboard.TargetName="ellipse"
                                           Storyboard.TargetProperty="(Canvas.Left)">
                    <LinearDoubleKeyFrame Value="700" KeyTime="0:0:2"/>
                </DoubleAnimationUsingKeyFrames>
            </Storyboard>
        </BeginStoryboard>
    </EventTrigger>
    <EventTrigger RoutedEvent="Canvas.MouseRightButtonUp">
        <BeginStoryboard>
            <Storyboard>
                <DoubleAnimationUsingKeyFrames Storyboard.TargetName="ellipse"
                                           Storyboard.TargetProperty="(Canvas.Left)">
                    <EasingDoubleKeyFrame Value="150" KeyTime="0:0:1">
                        <EasingDoubleKeyFrame.EasingFunction>
                            <CircleEase EasingMode="EaseOut"/>
                        </EasingDoubleKeyFrame.EasingFunction>
                    </EasingDoubleKeyFrame>
                </DoubleAnimationUsingKeyFrames>
            </Storyboard>
        </BeginStoryboard>
    </EventTrigger>
</Canvas.Triggers>
在Canvas的事件触发器中,我们一共定义了3种情况,分别是Canvas.Loaded、Canvas.MouseLeftButtonUp和Canvas.MouseRightButtonUp,每一种事件都会触发一个关键帧动画。通过DoubleAnimationUsingKeyFrames关键帧动画去控制ellipse对象相对于Canvas的左边距。
在Canvas.Loaded事件中,我们将椭圆从左到右以动画的形式显示在窗体的中间;
在Canvas.MouseLeftButtonUp事件中,我们让椭圆从中间位置往右运动,直至消失;
在Canvas.MouseRightButtonUp事件中,我们又让椭圆从右边回到窗体的中间位置。
最终形成的源代码如下所示:
<Window x:Class="HelloWorld.MainWindow"
xmlns="http://schemas.microsoft.com/winfx/2006/xaml/presentation"
xmlns:x="http://schemas.microsoft.com/winfx/2006/xaml"
xmlns:d="http://schemas.microsoft.com/expression/blend/2008"
xmlns:mc="http://schemas.openxmlformats.org/markup-compatibility/2006"
xmlns:local="clr-namespace:HelloWorld"
xmlns:controls="clr-namespace:HelloWorld.Controls"
xmlns:helper="clr-namespace:HelloWorld.MVVM"
mc:Ignorable="d"
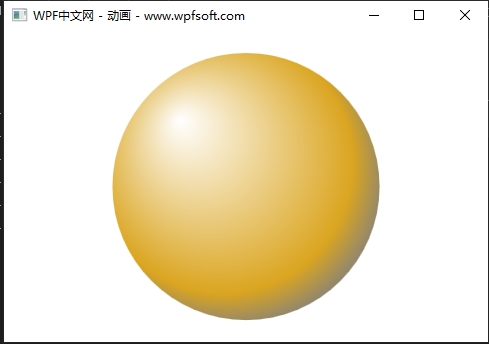
Title="WPF中文网 - 动画 - www.wpfsoft.com" Height="350" Width="500">
<Window.DataContext>
<local:MainViewModel/>
</Window.DataContext>
<Window.Resources>
<Storyboard x:Key="KeyFrameStoryboard">
<PointAnimationUsingKeyFrames
Storyboard.TargetName="ellipse"
Storyboard.TargetProperty="Fill.GradientOrigin"
AutoReverse="True"
RepeatBehavior="Forever">
<LinearPointKeyFrame Value="0.25,0.25" KeyTime="0:0:0"/>
<LinearPointKeyFrame Value="0.75,0.35" KeyTime="0:0:1"/>
<LinearPointKeyFrame Value="0.25,0.75" KeyTime="0:0:2"/>
<LinearPointKeyFrame Value="0.85,0.85" KeyTime="0:0:3"/>
</PointAnimationUsingKeyFrames>
</Storyboard>
<Storyboard x:Key="WidthStoryboard" TargetProperty="Width">
<DoubleAnimation
From="200"
To="300"
Duration="0:0:1.5"
AutoReverse="True"
RepeatBehavior="Forever">
</DoubleAnimation>
</Storyboard>
<Storyboard x:Key="HeightStoryboard" TargetProperty="Height">
<DoubleAnimation
From="200"
To="300"
Duration="0:0:1.5"
AutoReverse="True"
RepeatBehavior="Forever">
</DoubleAnimation>
</Storyboard>
</Window.Resources>
<Canvas x:Name="canvas" Background="Transparent">
<Canvas.Triggers>
<EventTrigger RoutedEvent="Canvas.Loaded">
<BeginStoryboard>
<Storyboard>
<DoubleAnimationUsingKeyFrames
Storyboard.TargetName="ellipse"
Storyboard.TargetProperty="(Canvas.Left)">
<LinearDoubleKeyFrame Value="0" KeyTime="0:0:0.5"/>
<EasingDoubleKeyFrame Value="150" KeyTime="0:0:2">
<EasingDoubleKeyFrame.EasingFunction>
<SineEase EasingMode="EaseInOut"/>
</EasingDoubleKeyFrame.EasingFunction>
</EasingDoubleKeyFrame>
</DoubleAnimationUsingKeyFrames>
</Storyboard>
</BeginStoryboard>
</EventTrigger>
<EventTrigger RoutedEvent="Canvas.MouseLeftButtonUp">
<BeginStoryboard>
<Storyboard>
<DoubleAnimationUsingKeyFrames Storyboard.TargetName="ellipse"
Storyboard.TargetProperty="(Canvas.Left)">
<LinearDoubleKeyFrame Value="700" KeyTime="0:0:2"/>
</DoubleAnimationUsingKeyFrames>
</Storyboard>
</BeginStoryboard>
</EventTrigger>
<EventTrigger RoutedEvent="Canvas.MouseRightButtonUp">
<BeginStoryboard>
<Storyboard>
<DoubleAnimationUsingKeyFrames Storyboard.TargetName="ellipse"
Storyboard.TargetProperty="(Canvas.Left)">
<EasingDoubleKeyFrame Value="150" KeyTime="0:0:1">
<EasingDoubleKeyFrame.EasingFunction>
<CircleEase EasingMode="EaseOut"/>
</EasingDoubleKeyFrame.EasingFunction>
</EasingDoubleKeyFrame>
</DoubleAnimationUsingKeyFrames>
</Storyboard>
</BeginStoryboard>
</EventTrigger>
</Canvas.Triggers>
<Ellipse x:Name="ellipse"
Canvas.Left="-200"
Canvas.Top="50"
Width="200"
Height="200">
<Ellipse.Triggers>
<EventTrigger RoutedEvent="Loaded">
<BeginStoryboard Storyboard="{StaticResource KeyFrameStoryboard}"/>
</EventTrigger>
</Ellipse.Triggers>
<Ellipse.Fill>
<RadialGradientBrush GradientOrigin="0.25,0.25"
RadiusX="0.75"
RadiusY="0.75">
<RadialGradientBrush.GradientStops>
<GradientStop Color="White" Offset="0" />
<GradientStop Color="LightCoral" Offset="0.65" />
<GradientStop Color="Gray" Offset="0.8" />
</RadialGradientBrush.GradientStops>
</RadialGradientBrush>
</Ellipse.Fill>
</Ellipse>
</Canvas>
</Window>
这是在前端XAML代码中使用关键帧中的情况,下一节,我们演示在C#后端使用关键帧。
当前课程源码下载:(注明:本站所有源代码请按标题搜索)
文件名:102-《关键帧动画》-源代码
链接:https://pan.baidu.com/s/1yu-q4tUtl0poLVgmcMfgBA
提取码:wpff
——重庆教主 2023年11月10日
我们同样以DoubleAnimation动画为例,演示如何在C#代码中实现动画效果。动画的本质是在一段时间内输出一个值,我们要做的事情就是把这个值赋值到某个依赖属性上,然后触发这个动画。
所以,要实现动画,可以简要分为3步,第一步,实例化一个目标对象,第二步,实例化一个动画对象,第三步,将动画对象输出的值赋值到目标对象的属性并启动该动画。前面两步由开发者完成,第三步由WPF来完成,那么,WPF是如何启动一个动画的?
在Animatable抽象基类中,有一个BeginAnimation()方法成员可以完成上述第三步的操作。
public abstract class Animatable : Freezable, IAnimatable, IResource
{
    public bool HasAnimatedProperties { get; }

    public static bool ShouldSerializeStoredWeakReference(DependencyObject target);
    public void ApplyAnimationClock(DependencyProperty dp, AnimationClock clock);
    public void ApplyAnimationClock(DependencyProperty dp, AnimationClock clock, HandoffBehavior handoffBehavior);
    public void BeginAnimation(DependencyProperty dp, AnimationTimeline animation);
    public void BeginAnimation(DependencyProperty dp, AnimationTimeline animation, HandoffBehavior handoffBehavior);
    public Animatable Clone();
    public object GetAnimationBaseValue(DependencyProperty dp);
    protected override bool FreezeCore(bool isChecking);

}
BeginAnimation()方法成员表示开启一个动画,第一个参数dp表示要被动作作用的依赖属性,第二个参数animation表示一个动画实例。
这里还在一个目标对象,它在哪?比如我们要在button上开启一个动画。我们可以这样做(伪代码):
Button button = new Button();
button.BeginAnimation(dp, animation);
此时,这个目标对象就是button。至于button为什么也有BeginAnimation(),那是因为Button继承了UIElement基类,而UIElement基类拥有BeginAnimation()方法成员。
下面我们还是以上一节的例子为例,为Ellipse椭圆实例化一个ScaleTransform对象,因为ScaleTransform继承了Animatable 抽象基类,所以就可以为它做一个动画。
前端代码如下:
<Grid x:Name="grid" Background="Transparent" MouseUp="grid_MouseUp">
    <Ellipse x:Name="ellipse"
             Width="200"
             Height="200">
        <Ellipse.RenderTransform>
            <ScaleTransform CenterX="100" CenterY="100"/>
        </Ellipse.RenderTransform>
        <Ellipse.Fill>
            <RadialGradientBrush GradientOrigin="0.25,0.25"
                                 RadiusX="0.75"
                                 RadiusY="0.75">
                <RadialGradientBrush.GradientStops>
                    <GradientStop Color="White" Offset="0" />
                    <GradientStop Color="Goldenrod" Offset="0.65" />
                    <GradientStop Color="Gray" Offset="0.8" />
                </RadialGradientBrush.GradientStops>
            </RadialGradientBrush>
        </Ellipse.Fill>
    </Ellipse>
</Grid>
在Grid 的鼠标单击事件中,我们执行下面的代码
private void grid_MouseUp(object sender, MouseButtonEventArgs e)
{
    Point mousePoint = e.GetPosition(grid);
    ScaleTransform scaleTransform = ellipse.RenderTransform as ScaleTransform;
    DoubleAnimation scaleDoubleAnimation = new DoubleAnimation()
    {
        To = (mousePoint.X + mousePoint.Y) / 200,
        Duration = new TimeSpan(0, 0, 0, 0, 250),
    };
    scaleTransform.BeginAnimation(ScaleTransform.ScaleXProperty, scaleDoubleAnimation);
    scaleTransform.BeginAnimation(ScaleTransform.ScaleYProperty, scaleDoubleAnimation);
}
在鼠标事件的回调函数中,我们实例化了一个DoubleAnimation ,这个动画表示目标值是由鼠标当前坐标计算得来的。然后找到ellipse的ScaleTransform实例,ScaleTransform实例有ScaleXProperty和ScaleYProperty两个依赖属性,分别表示X轴方向和Y轴方向的放大比,最后在scaleTransform实例上用BeginAnimation()方法成员开启动画。
F5运行调试,随着我们每一次鼠标的不同位置的单击,椭圆将被我们随机进行放大的动画处理效果。
当前课程源码下载:(注明:本站所有源代码请按标题搜索)
文件名:101-《在C#代码中使用动画》-源代码
链接:https://pan.baidu.com/s/1yu-q4tUtl0poLVgmcMfgBA
提取码:wpff
——重庆教主 2023年11月9日
DoubleAnimation动画只是AnimationTimeline众多子类中的一个,因为比较常用,我们将它作为本例中的动画对象。
public class DoubleAnimation : DoubleAnimationBase
{
    public static readonly DependencyProperty FromProperty;
    public static readonly DependencyProperty ToProperty;
    public static readonly DependencyProperty ByProperty;
    public static readonly DependencyProperty EasingFunctionProperty;

    public DoubleAnimation();
    public DoubleAnimation(double toValue, Duration duration);
    public DoubleAnimation(double toValue, Duration duration, FillBehavior fillBehavior);
    public DoubleAnimation(double fromValue, double toValue, Duration duration);
    public DoubleAnimation(double fromValue, double toValue, Duration duration, FillBehavior fillBehavior);

    public double? From { get; set; }
    public double? To { get; set; }
    public double? By { get; set; }
    public IEasingFunction EasingFunction { get; set; }
    public bool IsAdditive { get; set; }
    public bool IsCumulative { get; set; }

    public DoubleAnimation Clone();
    protected override Freezable CreateInstanceCore();
    protected override double GetCurrentValueCore(double defaultOriginValue, double defaultDestinationValue, AnimationClock animationClock);

}
从定义上看,它有4个(依赖)属性和2个普通属性,下表中罗列了它们的说明。
| 属性名 | 说明 |
| From | 获取或设置动画的起始值。 |
| To | 获取或设置动画的结束值。 |
| By | 获取或设置动画更改其起始值所依据的总数。 |
| EasingFunction | 获取或设置应用于此动画的缓动函数。 |
| IsAdditive | 是否应将目标属性的当前值添加到此动画的起始值。 |
| IsCumulative | 动画重复时是否累计该动画的值。 |
我们在上一节提到过,动画是可以做成资源的。所以,在本例中,我们将动画定义成一个资源。
<Window.Resources>
    <Storyboard x:Key="WidthStoryboard" TargetProperty="Width">
        <DoubleAnimation
                     From="200"
                     To="300"
                     Duration="0:0:1.5"
                     AutoReverse="True"
                     RepeatBehavior="Forever">
        </DoubleAnimation>
    </Storyboard>
    <Storyboard x:Key="HeightStoryboard" TargetProperty="Height">
        <DoubleAnimation
                     From="200"
                     To="300"
                     Duration="0:0:1.5"
                     AutoReverse="True"
                     RepeatBehavior="Forever">
        </DoubleAnimation>
    </Storyboard>
</Window.Resources>
在这个动画中,我们规定了在1.5秒内输出一个double值,由200变成300,并且反转播放和无限循环播放。至于将这个动画用在何处,并不是DoubleAnimation所关心的事情。谁关心这个值作用在何处?故事板的TargetProperty属性指示了输出的double要作用于目标对象的哪个属性。就像上面的WidthStoryboard和HeightStoryboard,说明Width和Height两个属性将在1.5秒内反复在200-300之间来回进行动画渲染。
至于这两个故事用在何处?它并不关心,哪个控件调用了这两个故事板,哪个控件就拥有了这样的动画效果。
如何调用动画?动画的启用必须要有一个触发机制,而触发器就可以触发一个动画。FrameworkElement基类的Triggers集合用来定义触发器。我们可以利用EventTrigger事件触发器在XAML代码中触发一个TriggerAction,比如BeginStoryboard就是TriggerAction的子类,在BeginStoryboard中可以设置一个Storyboard故事板。
<Ellipse.Triggers>
    <EventTrigger RoutedEvent="Loaded" >
        <EventTrigger.Actions>
            <BeginStoryboard Storyboard="{StaticResource WidthStoryboard }"/>
            <BeginStoryboard Storyboard="{StaticResource HeightStoryboard }"/>
        </EventTrigger.Actions>
    </EventTrigger>
</Ellipse.Triggers>
比如,我们要给一个Ellipse控件启用上面的动画,就可以在Ellipse的Triggers中实例化一个EventTrigger对象,并在EventTrigger对象的Actions属性中实例化两个BeginStoryboard实例,各自引用资源中已定义的两个Storyboard。
注意:WidthStoryboard 和HeightStoryboard 动画输出值是分别作用于目标对象的Width和Height两个属性,在使用前要确定Ellipse控件有没有Width和Height属性。其次,就算Ellipse控件有Width和Height属性,也要确认Width和Height属性的类型是不是double,毕竟DoubleAnimation动画值出的值可是double值哦,生产什么就消费什么,不可张冠李戴。
前端完整代码:
<Window x:Class="HelloWorld.MainWindow"
        xmlns="http://schemas.microsoft.com/winfx/2006/xaml/presentation"
        xmlns:x="http://schemas.microsoft.com/winfx/2006/xaml"
        xmlns:d="http://schemas.microsoft.com/expression/blend/2008"
        xmlns:mc="http://schemas.openxmlformats.org/markup-compatibility/2006"
        xmlns:local="clr-namespace:HelloWorld"
        xmlns:controls="clr-namespace:HelloWorld.Controls"
        xmlns:helper="clr-namespace:HelloWorld.MVVM"
        mc:Ignorable="d"
        Title="WPF中文网 - 动画 - www.wpfsoft.com" Height="350" Width="500">
    <Window.DataContext>
        <local:MainViewModel/>
    </Window.DataContext>
    <Window.Resources>
        <Storyboard x:Key="WidthStoryboard" TargetProperty="Width">
            <DoubleAnimation
                         From="200"
                         To="300"
                         Duration="0:0:1.5"
                         AutoReverse="True"
                         RepeatBehavior="Forever">
            </DoubleAnimation>
        </Storyboard>
        <Storyboard x:Key="HeightStoryboard" TargetProperty="Height">
            <DoubleAnimation
                         From="200"
                         To="300"
                         Duration="0:0:1.5"
                         AutoReverse="True"
                         RepeatBehavior="Forever">
            </DoubleAnimation>
        </Storyboard>
    </Window.Resources>
    <Grid x:Name="grid" Background="Transparent"
          MouseMove="grid_MouseMove">
        <Ellipse x:Name="ellipse"
                 Width="200"
                 Height="200">
            <Ellipse.Triggers>
                <EventTrigger RoutedEvent="Loaded" >
                    <EventTrigger.Actions>
                        <BeginStoryboard Storyboard="{StaticResource WidthStoryboard }"/>
                        <BeginStoryboard Storyboard="{StaticResource HeightStoryboard }"/>
                    </EventTrigger.Actions>
                </EventTrigger>
            </Ellipse.Triggers>
            <Ellipse.Fill>
                <RadialGradientBrush GradientOrigin="0.25,0.25"
                                     RadiusX="0.75"
                                     RadiusY="0.75">
                    <RadialGradientBrush.GradientStops>
                        <GradientStop Color="White" Offset="0" />
                        <GradientStop Color="Goldenrod" Offset="0.65" />
                        <GradientStop Color="Gray" Offset="0.8" />
                    </RadialGradientBrush.GradientStops>
                </RadialGradientBrush>
            </Ellipse.Fill>
        </Ellipse>
    </Grid>
</Window>
最后,F5运行调试,我们会看到Ellipse被不断放大缩小哦。另外,除了在XAML代码中运用动画,我们还可以在C#代码中使用动画效果,下一节来演示这样的用法。

当前课程源码下载:(注明:本站所有源代码请按标题搜索)
文件名:100-《DoubleAnimation动画》-源代码
链接:https://pan.baidu.com/s/1yu-q4tUtl0poLVgmcMfgBA
提取码:wpff
——重庆教主 2023年11月09日
一、动画的概念
动画本质上是一系列快速播放的图像。每两张图像之间略有区别,如果每秒种超过24张图像在我们眼前闪过,大脑会产生一种错觉,觉得这组图像就是一个不断变化的场景。所以动画与时间相关,确切的说——动画的背后有一个计时系统提供服务支持。
WPF集成了一个高效的计时系统,可以轻松地对控件和其他图形对象进行动画处理,以及完成计时系统和重绘屏幕的所有后台任务。所以,对于动画的概念而言,时间线才是最重要的概念。于是,WPF设计了一个TimeLine类型来表示时间线,而所有的动画都是这条时间线上的产物,所以,WPF的所有动画都继承于TimeLine基类。
TimeLine基类被定义在System.Windows.Media.Animation命名空间之中,它表示一段时间,开发者可以指定该时间段的长度、开始时间、重复次数、该时间段内时间进度的快慢等。TimeLine基类下面有3个子类,分别是AnimationTimeline、TimelineGroup和MediaTimeline。
WPF的时间线
| 时间线 | 说明 |
| AnimationTimeline | 一种生成输出值的时间线,将动画与属性关联时,动画在播放属性时会更新该属性的值,从而对它进行“动画处理”。比如在某一个时间段将按钮的宽度变宽。 |
| TimelineGroup | 表示多个时间线的集合。例如Storyboard故事板。 |
| MediaTimeline | 一种控制媒体文件播放的时间线。它提供对媒体计时的控制,其方式与动画时间线对象控制动画的方式相同。 |
TimeLine基类的子子孙孙:
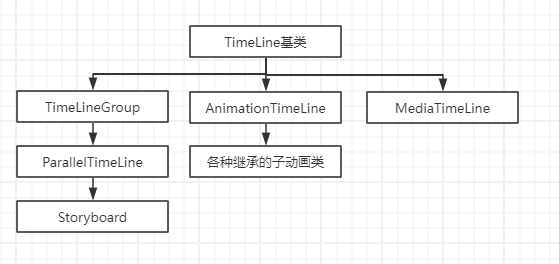
二、TimeLine基类介绍
public abstract class Timeline : Animatable
{
    public static readonly DependencyProperty AccelerationRatioProperty;
    public static readonly DependencyProperty AutoReverseProperty;
    public static readonly DependencyProperty BeginTimeProperty;
    public static readonly DependencyProperty DecelerationRatioProperty;
    public static readonly DependencyProperty DesiredFrameRateProperty;
    public static readonly DependencyProperty DurationProperty;
    public static readonly DependencyProperty FillBehaviorProperty;
    public static readonly DependencyProperty NameProperty;
    public static readonly DependencyProperty RepeatBehaviorProperty;
    public static readonly DependencyProperty SpeedRatioProperty;

    protected Timeline();
    protected Timeline(TimeSpan? beginTime);
    protected Timeline(TimeSpan? beginTime, Duration duration);
    protected Timeline(TimeSpan? beginTime, Duration duration, RepeatBehavior repeatBehavior);

    public bool AutoReverse { get; set; }
    public double SpeedRatio { get; set; }
    public RepeatBehavior RepeatBehavior { get; set; }
    public string Name { get; set; }
    public FillBehavior FillBehavior { get; set; }
    public Duration Duration { get; set; }
    public double DecelerationRatio { get; set; }
    public TimeSpan? BeginTime { get; set; }
    public double AccelerationRatio { get; set; }

    public event EventHandler CurrentTimeInvalidated;
    public event EventHandler CurrentStateInvalidated;
    public event EventHandler CurrentGlobalSpeedInvalidated;
    public event EventHandler RemoveRequested;
    public event EventHandler Completed;

    public static int? GetDesiredFrameRate(Timeline timeline);
    public static void SetDesiredFrameRate(Timeline timeline, int? desiredFrameRate);
    public Timeline Clone();
    public Timeline CloneCurrentValue();
    public Clock CreateClock(bool hasControllableRoot);
    public Clock CreateClock();
    protected override bool FreezeCore(bool isChecking);
    protected override void GetAsFrozenCore(Freezable sourceFreezable);
    protected override void GetCurrentValueAsFrozenCore(Freezable sourceFreezable);
    protected virtual Duration GetNaturalDurationCore(Clock clock);
    protected internal virtual Clock AllocateClock();
    protected internal Duration GetNaturalDuration(Clock clock);

}
既然所有的动画都要继承TimeLine时间线,所以,我们首先要了解这个基类为我们提供了哪些可用的属性、方法和事件。
三个经常使用的计时属性为 Duration、AutoReverse 和 RepeatBehavior。
Duration属性:表示当前动画的时间线的长度(默认值为1秒钟)。通常用 TimeSpan 值指定,例如:TimeSpan.FromSeconds(Double) 方法,它的格式:
| 设置 | 所得值 |
|---|---|
| 0:0:5.5 | 5.5 秒。 |
| 0:30:5.5 | 30 分 5.5 秒。 |
| 1:30:5.5 | 1 小时 30 分 5.5 秒。 |
AutoReverse属性:表示动画在时间线到达 Duration 的终点后是否倒退。为true表示倒退播放。
RepeatBehavior属性:表示当前动画的时间线的播放次数。默认值为1.0,表示只播放1次。
由于一个动画组可能由多条时间线动画组成,而有的时间线长,有的时间线短,那么,若父级时间线还没走完,而子级时间线走完时该怎么办呢?FillBehavior 属性(枚举型)指定时间线结束时的行为方式。FillBehavior.HoldEnd表示在达到活动期的终点后,时间线将保持其进度,直至其父级的活动期和保持期结束为止。FillBehavior.Stop表示如果时间线超出活动期,而其父级在活动期内,则该时间线将停止。
三、AnimationTimeline子类介绍
根据计时进度生成输出值,作用于目标属性进行动画处理。AnimationTimeline 对象可以声明为 资源、在多个对象之间共享、使只读以提高性能、克隆和线程安全。它有许许多多的动画子类可以使用。比如经常使用的DoubleAnimation 动画。
System.Windows.Media.Animation.BooleanAnimationBase
System.Windows.Media.Animation.ByteAnimationBase
System.Windows.Media.Animation.CharAnimationBase
System.Windows.Media.Animation.ColorAnimationBase
System.Windows.Media.Animation.DecimalAnimationBase
System.Windows.Media.Animation.DoubleAnimationBase
System.Windows.Media.Animation.Int16AnimationBase
System.Windows.Media.Animation.Int32AnimationBase
System.Windows.Media.Animation.Int64AnimationBase
System.Windows.Media.Animation.MatrixAnimationBase
System.Windows.Media.Animation.ObjectAnimationBase
System.Windows.Media.Animation.Point3DAnimationBase
System.Windows.Media.Animation.PointAnimationBase
System.Windows.Media.Animation.QuaternionAnimationBase
System.Windows.Media.Animation.RectAnimationBase
System.Windows.Media.Animation.Rotation3DAnimationBase
System.Windows.Media.Animation.SingleAnimationBase
System.Windows.Media.Animation.SizeAnimationBase
System.Windows.Media.Animation.StringAnimationBase
System.Windows.Media.Animation.ThicknessAnimationBase
System.Windows.Media.Animation.Vector3DAnimationBase
System.Windows.Media.Animation.VectorAnimationBase
上面列出来的全是AnimationTimeline的子类,而且全是抽象子类,真正能使用的还在下一级,因为这类动画都是输出一个值,并且将这个值赋值给目标对象的属性,在设定的时间段内,这个值不断变化,从而达到目标对象的属性值不断变化,最终绘制在界面上形成动画,又因为目标对象的属性类型是多种多种的,为了尽可能的去实现各种属性的动画,所以WPF才不得不实现这些动画子类。
虽然子类较多,但用法相同,学一两种动画即可举一反三。
四、TimelineGroup子类介绍
TimelineGroup下面有一个子类叫ParallelTimeline,而ParallelTimeline下面有一个叫子类叫Storyboard (故事板)。说白了,AnimationTimeline动画只是一个单一的时间线动画,往往一个动画是有多条时间线程,比如在一个动漫片段中,一个人往左走,一个人往右走,天上的白云飘飘,树上的叶子摇曳,这4个对象都在各自的时间线上呈现动画,将它们组合起来,就形成了一个TimelineGroup,也叫容器时间线或前情提要,它是时间线的集合,典型的就是Storyboard故事板。
Storyboard 是一种容器时间线,它为其包含的时间线提供目标信息。可以使用 Storyboard 对象将影响各种对象和属性的时间线组合成一个时间线树,以便于组织和控制复杂的计时行为。可以使用 Storyboard 对可动画处理的类的依赖属性进行动画处理。
五、MediaTimeline子类介绍
MediaTimeline是一个 Timeline 对象,它提供对媒体计时的控制,其方式与动画时间线对象控制动画的方式相同。例如, MediaTimeline 具有关联的 Duration 和 BeginTime 属性可用于指定媒体开始的时间及其播放时间。可通过两种方法使用 MediaTimeline将 关联Timeline到 MediaElement 。
好,关于动画的概述我们就分享到这里,下一节,我们将以实际的例子来演示AnimationTimeline一部分子类的用法
——重庆教主 2023年10月9日